(P) IT company
Goal: I will learn modularity in object-oriented programming and how classes (objects) can be related to each other. I will practice reading existing code and to use pointers and dynamic memory management. At the same time, I will revisit STL containers. I will also consider how to divide program into parts by using functions and classes.
Instructions:
Retrieve the code template: templates/10/it_company/ ->
student/10/it_company/.
The code template contains rather many files and classes, but they are
very simple and easy to be understood.
Some of the commands have already been implemented in the template code. You can start by testing their functionality.
Important
Before starting to write code, read carefully the whole assignment. Especially, note the sections Implementing the program in stages (required commits) and Special requirements.
From the point Evaluation note especially that the program must first pass all automated test. Otherwise the work will not be evaluated by assistants, and no points will be given.
Note
This project will be done independently. Working in pairs is not allowed, instead it will be considered as plagiarism.
Complete the program that reads user-given commands. Depending on the command, the program either stores data into a suitable data structure, remove data from it, or makes searches in the data structure in question.
Header comment and feedback language
In the same way as in the first project, the header comment is again required. This time we provide no ready-made header comment, but you should write it by yourself. You can use the first project’s assignment as an example (see 4.5 (P) Checkers).
The feedback language will be chosen in the submission box (at the very end of this page). By default, the feedback language is Finnish, but you can change it, if you want to have the feedback, given by an assistant, in English. We will use the language you have given in the submission box of the final submission.
Program description
The program consists of classes Company, Project, Employee,
Date, and Cli, as well as the module (namespace) Utils.
The objects (instances) of the class Employee describe staff in a company.
Employees can be recruited, and they can resign.
Employees can be identified by their names (as has been done in example
executions below), or any string.
In addition, employees have skills required in projects.
The class Project describes a single project.
Each project can have several employees, and each employee can work in
several projects.
A project has at least a start date, and closed projects have also
an end date.
Moreover, a project can have requirements, i.e. employees working in the
project must have certain skills.
The class Cli (command line interpreter) manages
the commands used in the program.
The module Utils provides general functions.
No changes are needed in either of these modules (Cli or Utils).
They, for example, check if the user gave a correct amount and type
of parameters for each command.
These checks are already implemented, so you need not care about them.
The class Company manages the program in whole, and only one instance
is created from it.
A company has staff and projects.
The relationships between classes can be seen in the figure below.
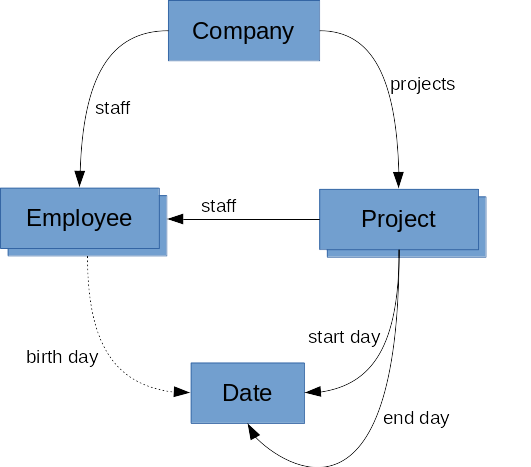
There is an arrow from class A to class B, if A knows B.
This means that the instance of B (or a pointer to it) is an attribute of A.
The class Cli and the module Utils have been left away from
the figure,
since they are utility modules, only weakly belonging to the company system.
Over the arrows you can see descriptive texts to make it easier to understand,
why the relation in question is needed.
In the figure, the birth day arrow is drawn as a dashed line, since such a relation would be very natural, but the program does not really use it.
As said above, the same employee can work in several projects. Therefore, you need pointers. Each employee is created only once, and when you need this employee in several actions, you will use a pointer to the employee. The same holds true with projects.
General information about the commands
The program has rather many commands (17), but your task is to implement only about half of them (8).
No input file is given for the program, and thus, the company is empty
at start, i.e. there are no staff nor projects.
All insertions (as well as removals) are done with commands.
However, among the commands, there is READ_FROM for reading
commands from a file (see command 3 in commands already implemented).
At start and each time the user is expected to give input, the program prints the prompt:
IT>
To this prompt, the user can give commands introcuded below
(or just press Enter).
The commands can be written by using lower-case letters, upper-case
letters, or by mixing them.
Therefore exit command can be written, for example, as QUIT,
quit, or Quit.
Each command has an acronym consisting of a couple of letters.
You can find the acronyms at the description of the HELP command below.
For example, the acronym of QUIT is Q (or q as a lower-case
letter).
Each command has a predefined number of parameters. You can see the parameters at each command description enclosed by angle brackets. If a parameter consists of several words, it must be enclosed by quote marks. If too less or too much parameters are given, the program prints the error message:
Error: Wrong amount of parameters.
Checking the amount of parameters is implemented in the template code, and thus, you need not care about it. Also processing quote marks has already been implemented.
If the user gives other command than that known by the program, the following error message is given:
IT> xxx
Error: Unknown commands given.
IT>
IT>
After completing the execution of a command given by the user, the program
prints the prompt again, until the user gives the command QUIT.
If the user just prints Enter without giving any command, the prompt is printed again, as shown in the latest example. In this sense, the program works like the command line in Linux desktop.
The next two sections first describe implemented commands and after that commands to be implemented. Naturally, there is no need to read the first one of these sections carefully, since you only need to know how to use the commands. However, the latter one of the sections must be read carefully, since it is your task to implement the commands.
The commands already implemented with their error messages
QUIT- The program terminates with the return valueEXIT_SUCCESSwithout printing anything. The command takes no parameters, but if such are given, they will be ignored.HELP- The command prints all available commands with their acronyms. Each line first shows a command description and then a colon followed by the command and its acronym:IT> HELP Quit : QUIT Q Help : HELP H Read : READ_FROM RF Set date : SET_DATE SD Advance date : ADVANCE_DATE AD Recruit staff : RECRUIT R Resign employee from company : LEAVE L Add skill for an employee : ADD_SKILL AS Print current staff : PRINT_CURRENT_STAFF PCS Create a new project : CREATE_PROJECT CR Close a project : CLOSE_PROJECT CL Print all projects : PRINT_PROJECTS PP Add requirement for a project : ADD_REQUIREMENT AR Assign employee for a project : ASSIGN A Print project's info : PRINT_PROJECT_INFO PPI Print employee's info : PRINT_EMPLOYEE_INFO PEI Print active staff : PRINT_ACTIVE_STAFF PAS IT> IT> HELP AS Add skill for an employee : ADD_SKILL AS Params: employee id skill name IT>
The command has one optional parameter. If no parameter is given, the command prints information about all commands. If a command is given as a parameter, the
HELPcommand prints more precise information about the given command.READ_FROM <file>- The command reads other commands with their parameters from the given file, which makes testing the program easier. The template code includes the fileassignment.txt, which includes some of the commands presented in the example executions. The file attached uses acronyms of the commands. The content of the file is as follows:r "Teemu Teekkari" l "Teemu Teekkari" r "Teemu Teekkari" as "Teemu Teekkari" C++ cr Checkers ad 3 ar Checkers Git cl Checkers cr Theatre a "Teemu Teekkari" Theatre q
An input file can be given as a parameter for the reading command as follows:
IT> READ_FROM assignment.txt
Input read from file: assignment.txt
IT>
In this way, you can execute all successful commands in the file faster than writing them one by one after the prompt.
Note that the file
assignment.txtincludes also such commands that have not been implemented in the template code.If the input file includes an erroneous command, e.g. a command with a wrong number of parameters, no error message is given, as will be given in the command line. Moreover, the last command in the file must be
QUIT(or its acronym), since otherwise reading the file never stops. Therefore it is important to follow these instructions, if you use an input file written by yourself when testing the program. Testing the program (in one way or another) is highly recommended.If the file given as a parameter is unknown, the program prints the error message:
IT> READ_FROM not_found.txt
Error: Can't read given file.
After this the program terminates its execution with the return value
EXIT_SUCCESS.SET_DATE <dd> <mm> <yyyy>- The command sets the date to be the datedd.mm.yyyy. (The current date is set as 1.9.2023 in the fileutils.hh, and if you wish, you can change it also in the code, but the current command makes the same thing.) The command takes three integer parameters. If the number of given day (or month) is 1, it can be given either as1or01, and the same holds for other 1-digit numbers. For example:IT> SET_DATE 2 09 2023 Date has been set to 2.9.2023 IT>
If the number given as a parameter is too great to be able to be a correct day or month, the number in question will be 1. For example:
IT> SET_DATE 32 13 2023
Date has been set to 1.1.2023
IT>
If the given parameters are something else than positive integer numbers, the program prints the error message:
IT> SET_DATE 1 3 ww
Error: Wrong type of parameters.
IT>
ADVANCE_DATE <non-negative integer>- The command advances the current date (1.9.2023) with the given number of days ahead. By using zero as the parameter, the command reveals the current date:IT> ADVANCE_DATE 0 New date is 1.9.2023 IT>
If a positive number is given as a parameter, the date is advanced the same number of days ahead:
IT> ADVANCE_DATE 7
New date is 8.9.2023
IT>
If the given parameter is negative, the program prints the error message:
IT> ADVANCE_DATE -1
Error: Wrong type of parameters.
IT>
RECRUIT <id>- The command recruits a new employee to the company. The command requires one parameter that can be a name. (The given id will be used as a parameter for other commands.) An example on recruiting staff:IT> RECRUIT "Teemu Teekkari" A new employee has been recruited. IT> RECRUIT "Teemu Teekkari" Error: Already exists: Teemu Teekkari IT>
Above you can also see the error message to be printed, if a staff member with the given id already exists.
However, if an employee leaves the company, they can be added again later, as can be seen in the example of the next command.
LEAVE <id>- The command removes (resigns) the given employee from the company. However, the command does not remove the employee from the projects they have worked in. (This data is left in the history of the projects.) For example:IT> LEAVE "Teemu Teekkari" Employee left company. IT> LEAVE "Teemu Teekkari" Error: Can't find anything matching: Teemu Teekkari IT> RECRUIT "Teemu Teekkari" A new employee has been recruited. IT>
Above you can also the error message to be printed, if the given employee cannot be found. The employee cannot be found, if they have resigned earlier. After resign, the employee can be recruited again, and they have the skills added in the previous working period. (This can be seen with the command
PRINT_EMPLOYEE_INFO, to be introduced later, in the next part.)ADD_SKILL <id> <skill>- The command adds a new skill for an employee. If the employee already has the skill, nothing happens, even no error message is printed:IT> ADD_SKILL "Teemu Teekkari" C++ Skill added for: Teemu Teekkari IT> ADD_SKILL "Teemu Teekkari" C++ Skill added for: Teemu Teekkari IT> ADD_SKILL xx C++ Error: Can't find anything matching: xx IT> LEAVE "Teemu Teekkari" Employee left company. IT> ADD_SKILL "Teemu Teekkari" Python Error: Can't find anything matching: Teemu Teekkari IT>
Above you can also the error message to be printed, if the given employee cannot be found. It is not possible to add a skill for a resigned employee.
PRINT_CURRENT_STAFF- The command prints all current staff, i.e. employees recruited, but not resigned. Employees’ ids are listed in alphabetical order, one below another. If there is no staff in the company, the program printsNone. For example:IT> PRINT_CURRENT_STAFF None IT> RECRUIT "Teemu Teekkari" A new employee has been recruited. IT> RECRUIT "Aatu Arkkari" A new employee has been recruited. IT> RECRUIT "Essi Esimerkki" A new employee has been recruited. IT> LEAVE "Essi Esimerkki" Employee left company. IT> PRINT_CURRENT_STAFF Aatu Arkkari Teemu Teekkari IT>
Commands to be implemented with their error messages
CREATE_PROJECT <id>- The command adds a new project in the company. The command requires id parameter that can be the name of the project. (The given id will be used as a parameter for other commands.) An example on adding a project:IT> CREATE_PROJECT Checkers A new project has been created. IT> CREATE_PROJECT Checkers Error: Already exists: Checkers IT>
Above you can also see the error message to be printed, if a project with the given id already exists. The error message is given for all projects already created (during the same execution), even if the project has been closed.
Besides the id, also the start date will be given for a new project. It is the current value of
todayvariable ofUtilsmodule.CLOSE_PROJECT <id>- The command closes a project. Closing means that an end date is set for the project. This date is the current value oftodayvariable ofUtilsmodule. The data about the project (id, staff, requirements, and dates) is kept. For example:IT> CLOSE_PROJECT Checkers Project closed. IT> CLOSE_PROJECT Checkers Project closed. IT> CREATE_PROJECT Checkers Error: Already exists: Checkers IT> CLOSE_PROJECT xx Error: Can't find anything matching: xx IT>
Above you can see that it is possible to close a project several times (since its data is kept). Re-close does nothing, even the end date does not change. However, a closed project cannot be re-created. If the given parameter is a totally unknown project (a project that has never been created), the program prints the error message shown above.
Keeping the data can be seen with the command
PRINT_PROJECT_INFOa bit later.PRINT_PROJECTS- The command prints all projects in the order, they have been created. From each project, its id and start date are printed. From a closed project, also the end date is printed. If there are no projects created yet, the command prints the textNone. A more precise form of print can be seen in the example:IT> PRINT_PROJECTS None IT> CREATE_PROJECT Checkers A new project has been created. IT> CREATE_PROJECT Theatre A new project has been created. IT> ADVANCE_DATE 3 New date is 4.9.2023 IT> CLOSE_PROJECT Checkers Project closed. IT> CREATE_PROJECT GUI-project A new project has been created. IT> PRINT_PROJECTS Checkers : 1.9.2023 - 4.9.2023 Theatre : 1.9.2023 - GUI-project : 4.9.2023 - IT>
ADD_REQUIREMENT <id> <requirement>- The command adds a new requirement for a project. If the project already has the requirement, nothing happens, even no error message is printed:IT> CREATE_PROJECT Checkers A new project has been created. IT> IT> ADD_REQUIREMENT Checkers Git Requirement added for: Checkers IT> ADD_REQUIREMENT Checkers Git Requirement added for: Checkers IT> ADD_REQUIREMENT xx Git Error: Can't find anything matching: xx IT> CLOSE_PROJECT Checkers Project closed. IT> ADD_REQUIREMENT Checkers C++ Error: Can't find anything matching: Checkers IT>
Above you can also the error message to be printed, if the given project cannot be found. It is not possible to add requirements for a closed project.
Project’s requirements and employee’s skills must match such that an employee to be assigned in a project must have at least one skill that can be found from the requirements of the project. (This is checked in command
ASSIGN, to be introduced next, although this command is used already in the example below.)However, it is possible to add requirements for a project after employees have been assigned in it. If after adding requirements, the project has an employee that has no skills required in the project, the employee is taken away from the project. (This is possible only if the project originally had no requirements, i.e. in the case of adding the very first requirement.) For example:
IT>
IT> RECRUIT "Teemu Teekkari"
A new employee has been recruited.
IT> CREATE_PROJECT Theatre
A new project has been created.
IT> ASSIGN "Teemu Teekkari" Theatre
Staff assigned for: Theatre
IT> ADD_REQUIREMENT Theatre Git
Not qualified any more: Teemu Teekkari
Requirement added for: Theatre
IT>
IT> RECRUIT "Aatu Arkkari"
A new employee has been recruited.
IT> CREATE_PROJECT GUI-project
A new project has been created.
IT> ASSIGN "Teemu Teekkari" GUI-project
Staff assigned for: GUI-project
IT> ASSIGN "Aatu Arkkari" GUI-project
Staff assigned for: GUI-project
IT> ADD_REQUIREMENT GUI-project Qt
Not qualified any more: Aatu Arkkari, Teemu Teekkari
Requirement added for: GUI-project
IT>
IT> ADD_SKILL "Teemu Teekkari" Git
Skill added for: Teemu Teekkari
IT> ASSIGN "Teemu Teekkari" Theatre
Staff assigned for: Theatre
IT>
Above you can see that unqualified employees are listed in one line, in alphabetical order, separated by a comma. As also seen above, the removed employee can be assigned again after adding the required skill for them.
(The command
PRINT_PROJECT_INFO, to be introduced later, prints requirements in alphabetical order.)ASSIGN <employee id> <project id>- The command assigns the given employee to work in the given project. As said in the previous command, the employee to be assigned must have at least one skill that can be found from the requirements of the project. If the project has no requirements, no skill requirements are expected from the employee, either. For example:IT> RECRUIT "Teemu Teekkari" A new employee has been recruited. IT> CREATE_PROJECT Checkers A new project has been created. IT> ADD_REQUIREMENT Checkers Git Requirement added for: Checkers IT> ASSIGN "Teemu Teekkari" Checkers Error: Can't assign: Teemu Teekkari IT> ADD_SKILL "Teemu Teekkari" Git Skill added for: Teemu Teekkari IT> ASSIGN "Teemu Teekkari" Checkers Staff assigned for: Checkers IT> ASSIGN "Teemu Teekkari" Checkers Error: Can't assign: Teemu Teekkari IT>
From the example above, you can see that at first the employee to be assigned has not the required skill. After adding the skill, the employee can assigned in the project. However, re-assignment is not possible after a succesfull assignment.
An employee cannot be assigned in a closed project (assuming that the commands in the previous example have been executed):
IT>
IT> CREATE_PROJECT Theatre
A new project has been created.
IT> CLOSE_PROJECT Theatre
Project closed.
IT> ASSIGN "Teemu Teekkari" Theatre
Error: Can't assign: Teemu Teekkari
IT>
Note that the error message above can appear in three cases: the project is closed, the employee is missing a skill, or the employee is tried to assign again in the same project, where they have already assigned.
If the employee or the project given as a parameter cannot be found, the program prints the error message (assuming that the commands of two previous examples have been executed):
IT>
IT> ASSIGN xx Checkers
Error: Can't find anything matching: xx
IT> ASSIGN "Teemu Teekkari" yy
Error: Can't find anything matching: yy
IT> ASSIGN xx yy
Error: Can't find anything matching: xx
IT>
Note that the error message is given only of the first unidentified parameter.
PRINT_PROJECT_INFO <id>- The command prints information about the given project: start date, requirements, and staff. From a closed project, also the end date is printed. Requirements and employees are printed in alphabetical order, both of these in one line separated by a comma. If the project has no requirements or staff, the wordNoneis printed instead. A more precise form of print can be seen in the example below:IT> CREATE_PROJECT Checkers A new project has been created. IT> PRINT_PROJECT_INFO Checkers Checkers : 1.9.2023 - ** Requirements: None ** Staff: None IT> ADD_REQUIREMENT Checkers Git Requirement added for: Checkers IT> ADD_REQUIREMENT Checkers C++ Requirement added for: Checkers IT> RECRUIT "Teemu Teekkari" A new employee has been recruited. IT> ADD_SKILL "Teemu Teekkari" Git Skill added for: Teemu Teekkari IT> RECRUIT "Aatu Arkkari" A new employee has been recruited. IT> ADD_SKILL "Aatu Arkkari" C++ Skill added for: Aatu Arkkari IT> ASSIGN "Teemu Teekkari" Checkers Staff assigned for: Checkers IT> ASSIGN "Aatu Arkkari" Checkers Staff assigned for: Checkers IT> PRINT_PROJECT_INFO Checkers Checkers : 1.9.2023 - ** Requirements: C++, Git ** Staff: Aatu Arkkari, Teemu Teekkari IT> ADVANCE_DATE 3 New date is 4.9.2023 IT> CLOSE_PROJECT Checkers Project closed. IT> PRINT_PROJECT_INFO Checkers Checkers : 1.9.2023 - 4.9.2023 ** Requirements: C++, Git ** Staff: Aatu Arkkari, Teemu Teekkari IT> LEAVE "Teemu Teekkari" Employee left company. IT> PRINT_PROJECT_INFO Checkers Checkers : 1.9.2023 - 4.9.2023 ** Requirements: C++, Git ** Staff: Aatu Arkkari, Teemu Teekkari IT> IT> PRINT_PROJECT_INFO xx Error: Can't find anything matching: xx IT>
Above you can also the error message to be printed, if the given project cannot be found. You can also see that project information is kept even if the project is closed or if an employee has left the company.
PRINT_EMPLOYEE_INFO <id>- The command prints information about an employee: their skills and projects in which they are working or have worked. Skills are listed in alphabetical order, all in same line, separated by a comma. Projects are listed, each in a line of its own, in the order in which the employee has been assigned in them. From each project, the start date is printed, and from closed projects also the end date is printed. If the employee has no skills or projects assigned, the wordNoneis printed instead. A more precise form of print can be seen in the example below:IT> RECRUIT "Teemu Teekkari" A new employee has been recruited. IT> PRINT_EMPLOYEE_INFO "Teemu Teekkari" Skills: None Projects: None IT> IT> CREATE_PROJECT Checkers A new project has been created. IT> CREATE_PROJECT Theatre A new project has been created. IT> CREATE_PROJECT GUI-project A new project has been created. IT> ASSIGN "Teemu Teekkari" Theatre Staff assigned for: Theatre IT> ADD_SKILL "Teemu Teekkari" Python Skill added for: Teemu Teekkari IT> PRINT_EMPLOYEE_INFO "Teemu Teekkari" Skills: Python Projects: ** Theatre : 1.9.2023 - IT> IT> ADD_SKILL "Teemu Teekkari" C++ Skill added for: Teemu Teekkari IT> ADVANCE_DATE 3 New date is 4.9.2023 IT> CLOSE_PROJECT Theatre Project closed. IT> ASSIGN "Teemu Teekkari" GUI-project Staff assigned for: GUI-project IT> PRINT_EMPLOYEE_INFO "Teemu Teekkari" Skills: C++, Python Projects: ** Theatre : 1.9.2023 - 4.9.2023 ** GUI-project : 1.9.2023 - IT> IT> PRINT_EMPLOYEE_INFO xx Error: Can't find anything matching: xx IT> LEAVE "Teemu Teekkari" Employee left company. IT> PRINT_EMPLOYEE_INFO "Teemu Teekkari" Error: Can't find anything matching: Teemu Teekkari IT> RECRUIT "Teemu Teekkari" A new employee has been recruited. IT> PRINT_EMPLOYEE_INFO "Teemu Teekkari" Skills: C++, Python Projects: ** Theatre : 1.9.2023 - 4.9.2023 ** GUI-project : 1.9.2023 - IT>
Above you can also the error message to be printed, if the given employee cannot be found. The employee cannot be found if they have resigned. However, their data (skills, projects) is kept between different working periods.
PRINT_ACTIVE_STAFF- The command prints active employees, i.e. those ones who are working or have worked in a project. Active employees are printed in alphabetical order based on their ids, each one in a line of their own. If the company has no active employees, the program printsNone. For example:IT> RECRUIT "Teemu Teekkari" A new employee has been recruited. IT> RECRUIT "Aatu Arkkari" A new employee has been recruited. IT> CREATE_PROJECT Checkers A new project has been created. IT> PRINT_ACTIVE_STAFF None IT> ASSIGN "Teemu Teekkari" Checkers Staff assigned for: Checkers IT> PRINT_ACTIVE_STAFF Teemu Teekkari IT> CLOSE_PROJECT Checkers Project closed. IT> PRINT_ACTIVE_STAFF Teemu Teekkari IT> LEAVE "Teemu Teekkari" Employee left company. IT> PRINT_ACTIVE_STAFF Teemu Teekkari IT> PRINT_CURRENT_STAFF Aatu Arkkari IT> IT> RECRUIT "Essi Esimerkki" A new employee has been recruited. IT> CREATE_PROJECT Theatre A new project has been created. IT> ASSIGN "Essi Esimerkki" Theatre Staff assigned for: Theatre IT> PRINT_ACTIVE_STAFF Essi Esimerkki Teemu Teekkari IT>
Modules of the program
The code template consists of the main program module and six other modules.
The main program module is very simple.
It just starts the command line interpreter (CLI) that goes on until
the QUIT command is given by the user.
There is no need to change the main program.
The program contains the module Utils that is not a class but a
namespace.
It provides the utility function split that you should be familiar with,
the function is_numeric, and the date today.
If you wish, you can update the date value in the file utils.hh.
Currently its value is 1.9.2023.
Otherwise, there is no need to change this module.
The date can also be changed with the command SET_DATE.
The command line interpreter, i.e. the class Cli has been defined and
implemented in files cli.hh and cli.cpp.
This class is completely implemented in the code template, and you
need not modify it.
The purpose of the class is to identify the commands from the user input.
All the commands will be implemented in the Company class.
The header file of the command line interpreter defines a command
vector including function pointers.
From it you can see which function in class Company implements each
command.
The other parts of the functionality of command line interpreter are
not necessary to understand.
Especially, knowing/understanding function pointers is not required.
The class Date describes dates.
Each part of a date (day, month, year) is presented as an integer.
A day can be moved forward by calling the method advance,
which advances the date by the given number of days.
The method is_default tells if the date is a default one, i.e.
a date with zero as the value of day, month, and year.
If a project has not yet closed, its end date is the default one.
Therefore, you can use is_default method to check, if a project
has ended or not.
Moreover, Date class provides methods for setting a date and for printing
it.
It is possible to compare the equality between dates.
In addition, the class provides the < operator:
date a is less than date b, if a precedes b.
(The current code does not use comparison operator functions.)
You need not change the class Date.
The class Employee describes an employee.
Employees can be identified based on attribute id_.
The examples given earlier used names as identifiers, which requires
unique names of employees.
The class Employee has the attribute date_of_birth_, but it is
not actually necessary.
The class Employee need not necessarily be changed, but you can add there
new methods, which you call from other methods you have implemented in
other classes, if these methods logically belong to this class.
The program has the class Project for describing a project.
It is your task to implement the class.
The class Company describes a company (in general, there can be
several of them, but in this program, we need only one).
A company could be from any business area, but examples in this assignment
considers it as an IT company.
The class contains information about all the employees and projects
in the company.
For storing this data, the class has containers that are
added with new elements based on user-given commands.
All the commands targeting to the company will be implemented in this class,
but the command methods can call other methods from other classes.
Note that an employee can work in several projects, and a project can
have several employees.
In such cases, only one Employee object is created, and the object
is pointed from several places (data structures).
In such situations, pointers are essential.
Similarly, there can be several pointers to one Project object.
The relationships between modules (classes) have been described in the figure at the beginning of the assignment.
The assignment in more detail
Your task is to complete the classes Company and Project
such that commands work in the way described above.
You can change also the other classes if needed.
You can, for example, feel it necessary to add new methods in a class.
Most of the data structures are given in the code template.
The class Project is almost empty, and thus, you can design and
implement it totally by yourself.
The class Company has no implementations for the methods:
create_projectclose_projectprint_projectsadd_requirementassignprint_project_infoprint_employee_infoprint_active_staff.
The purpose of each above is to implement a command with the same name. Feel free to implement other utility functions, as well as add new attributes.
Especially note that the destructor of class Company is not finished,
but you should complete it.
Program code (e.g. printing code) should be placed in the class, the data of which is processed (printed). For example, a printing chain can start from a ”bigger” class, which prints something by itself and then asks its parts to print their portion. Here a bigger class means a class, which has intances of other classes as its parts (attributes).
While designing and implementing the assignment, it is especially important to pay attention to how instances (objects or pointers to them) of one class can be attributes of another class.
Command functions (a method that implements a command) have the
parameter params, the type of which is Params.
This means a vector, the definition of which is in the file company.hh.
The number of parameters are checked in the method exec of
class Cli.
Therefore you can assume that the vector params has exactly the
same number of elements as the command in question requires.
However, some commands have no parameters, whereupon the corresponding
command functions do not use the parameter params they receive.
In such cases, the name of the parameter is left away, but not the type of it.
The type cannot be left away, since these functions are called
via a function pointer.
All functions called via a function pointer of the same type must
have the same number of parameters of the same type.
All these things have been implemented in the template code, and thus,
you need not care about this.
Implementing the program does not require knowing anything about
function pointers.
Tips
- Start by studying the ready-made code.
You need not understand all the details in the given code.
It does not matter, if you do not understand code of
Cli. From the other classes, you should find out, which methods they provide (public methods) and which attributes they have. Explore the implementation details of methods only if/when you notice the need for these details. In most cases it is enough that you conclude the purpose of a method from its name. - Before implementing the program, think carefully how to structure the program to be able fulfill all the requirements.
- The main things to be practiced in this project are modularity and pointers.
However, you need add a couple of STL containers but choosing them
should not be a big issue at this point.
- What would be a suitable container for the projects of a company, if the aim is to go through the projects in the order, in which they have been added?
- What would be a suitable container for the staff of a project, if the aim is to print the staff members in alphabetical order?
- Note that
constfunctions inside a class cannot call those functions of the same class that are not defined asconst. You can notice this by the compilation error[-fpermissive]. In other words, a function that cannot change the state of the object, cannot call a function that is able to change the state of the object. - Recall that as a default, the program will be compiled into a build-directory. So, for testing purposes, you can move possible input data files to this same directory.
Implementing the program in parts
In this phase of the course, you should have a conception on, in which parts to implement the program and which commits to use.
Special requirements
If you want your assignment to pass the evaluation, you must meet these requirements:
- You must use dynamic memory management in your program. However, it must not have errors related to memory management. Therefore executing valgrind is recommended. Pointers used in the program can be normal pointers, smart pointer, or both of them.
- Containers only from STL library are allowed, not e.g. from Boost.
Evaluation
To end up to assistants’ evaluation, your work must first pass the automated tests. If the automated tests give 0 points for your work, also your final points will be 0, and your work will not be evaluated by an assistant. Automated tests will also run valgrind, so your program will not pass tests, if there are errors related to memory management. Therefore it is recommended to run valgrind by yourself before submitting the program.
The assistant evaluates the latest Plussa submission that has passed the automated testing (= 1 p) and fulfilled the special requirements of the assignment before the deadline, according to the following criteria:
- The overall principle of the solution: 0-40 points:
- The learning goals of the exercise have been achieved.
- The program code has been split into logical, suitably long segments using functions, classes, and/or methods.
- If the program uses classes and objects, these have been implemented according to the basics of object-oriented programming (see from round 4 the section About programming style at Object-oriented programming).
- The data structure does not include repetitive data nor unnecessary parts. The chosen data structures have been used in a reasonable way.
- The program code does not include unnecessary repetitions nor other unnecessary parts.
- The program code does not include unnecessary limitations or assumptions or other forced solutions.
- The implementations of the program’s structures are easy to understand.
- Global variables have not been used in the program code (global constants are OK).
- The program does not terminate with the
exitfunction. - The program has no errors related to memory management (use valgrind).
- Programming style: -20-0 points:
- Variables and functions are named clearly and appropriately. These items have named by using only one language, not e.g. Finnish and English mixed.
- Named constants have been used instead of magic numbers.
- The program code is neatly formatted.
- The length of program code lines do not exceed 80 characters.
- At the beginning of each file written/edited by yourself, there is a comment explaining the purpose of the file, your name, student number, and other necessary information. (You can learn from the example in the assignment of the first project.)
- At the beginning of each function/method (in the header file if such exists), there is a comment describing its working, return value, and parameters.
- There are comments in the code where necessary.
- Comments are related to the current version of the program, not to an older one.
- All comments have written in the same language (fi/en), but comments can be written in a language different from that used in naming variables and such.
- All the variables have been initialized.
- The compiler does not give warnings while compiling.
- Using the version control: 0-10 points:
- There are enough commits.
- The content of commit messages is clear and relevant.
From the above list, please note that in this phase of the course it is assumed that the student follows good programming style. Therefore, you will not get points from following the style guidelines, but if you do not follow them, your points will be decreased. So, it is recommended to revisit the material about programming style on rounds 4 and 10.
Note about evaluation
Automated tests check if your program works, but assistants pay attention to your coding style and other evaluation criteria listed above. Therefore, it could be possible that a fully working program brings you only zero points, if the above criteria are not met.
Requirements concerning especially good programming style can be found from the earlier material section on the current round.
Note about submission versions
The version to be evaluated is the one that corresponds to your latest successful Plussa submission (within the deadline). A successful submission means such a submission that passed automated tests.
After the first successful submission, you most probably want to improve your coding style (e.g. add comments), assuming that the deadline is not too close.
Anyway, remember finally this: After the final Git push, submit your work also in Plussa.
A+ presents the exercise submission form here.