GUI application with Qt
On the previous programming course we already created graphical user interfaces with the Tkinter library of Python. Just as Python, C++ also has several libraries for creating user interfaces. We selected the Qt library of C++ for implementing graphical user interfaces on this course. (Qt is a library, and Qt Creator is a programming environment where the mentioned library can be easily used.)
On the previous programming course we learned that all the components of a user interface, such as the user interface window itself, are objects. We also learned that the graphical user interfaces have a so-called event handler that follows, for example, the mouse clicks in a user interface. Qt follows the same principles. That is why we now just need to learn which objects are already implemented in Qt, and how to use them.
We will get to know Qt by way of you first creating a new project in Qt Creator.
Qt Creator generates an empty user interface window, from which you can start.
We will see the code inside that base.
In the two next material sections, our example will be
the template code of the exercise
templates/12/colorpicker_designer, which includes some simple
functionalities.
(Remember to copy it into student/12/colorpicker_designer.)
The most important mechanisms of Qt will be explained with the
help of these two programs.
Creating a project with a graphical user interface
Create a new project in Qt Creator, and make it include a graphical user interface:
As usual, start Qt Creator in the menu at the top bar of the virtual desktop:
Applications > Programming > Qt Creator.Creating a new project has the usual first steps:
File > New File or Project..., or choose the button New Project in the main window of Qt Creator.From now on, creating the project is somewhat different to what we are used to. In the window New Project, you should this time select the project type like this:
Applications > Qt Widgets Application(until now, we always selectedNon-Qt Project > Plain C++ Project).As usual, select your project file in the Introduction and Project Location window. You can name the program e.g. as
first_gui(our purpose it just to create an empty user interface for this project).Complete Kit Selection as usual, because aside from what is offered, no other developing environments are provided for virtual desktops. If you have installed Qt Creator on your own computer, you might have other options here. In that case, do as you have done earlier.
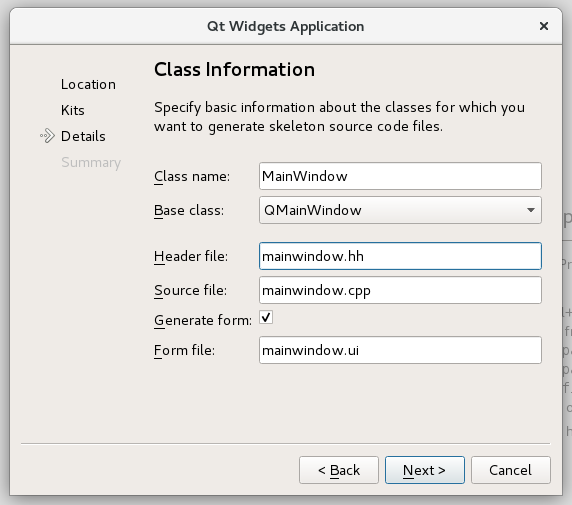
Now, the Class Information window that opens up is the biggest difference to the earlier projects. Complete your selections according to the following illustration:
You will see the filenames updating automatically when you choose a name for your user interface class at ”Class name.”
In the Project Management window, you should select the Add to Version Control field to have the value ”<None>”. After this, you can click the Finish button.
You have now created the project, and Qt Creator has automatically formed a project file, the bodies of source code files, and a file with the suffix
.uithat describes the user interface formed in Qt Designer. In case you named your user interface classMainWindow, Qt Creator has created these files:main.cpp mainwindow.cpp mainwindow.hh mainwindow.ui first_gui.pro
More about these in a while.
Before starting to code, remember to add the following line in your
.profile:CONFIG += c++14
for avoiding problems later.
You can compile and execute the body of the user interface generated by Qt Creator normally, by clicking the run button (green triangle).
At this point, the program will not do anything particularly interesting, because the automatically generated code only includes the empty main window where the programmer can form the user interface they want.
Files created by Qt
Let us have a look at the files created by Qt Creator in order to get
an idea about the structure of the program on a general level.
We will proceed in this order: main.cpp, mainwindow.hh,
mainwindow.cpp, and finally, mainwindow.ui.
main.cpp
The file includes automatically generated code that creates the object of the type
MainWindowand launches the user interface.In programs that are as simple as the ones we are creating on this course, there is no need to edit
main.cpp.On the last line of the function, the call of
exectargeted to the objectQApplicationis Qt’s way to start an event loop (or main loop) that we talked about already when we learned about Tkinter on the previous programming course.Otherwise, there is nothing particularly interesting in the main program module.
mainwindow.hh
All the user interface elements in Qt have been inherited from the class
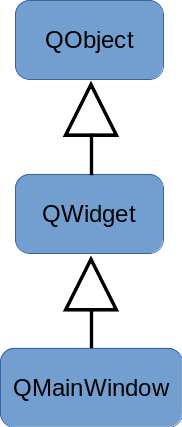
QObject, whose public interface provides some very-low-level tools for handling user interface elements (widgets) (e.g. the communication between different user interface elements with the signal-slot mechanism).An ordinary programmer rarely ends up using the class
QObjectdirectly, and you can barely see it in the code produced by Qt Creator, excluding the lineQ_OBJECTinmainwindow.hhwhich you do not have to care about now.The class
QObjectis the base class for the classQWidget, which again works as a base class for all of the user interface elements of Qt (sliders, buttons, menus, et cetera).When a programmer wants to create their own (simple) user interface, they implement a class of their own that has been inherited from the class
QMainWindow, and add to it new features that must be included in the user interface element they are implementing. The classQMainWindowhas also been inherited fromQWidget. The filemainwindow.hh, created by Qt Creator, shows us how the main window of this exercise has been implemented as the classMainWindow, inherited from the classQMainWindow. The programmer can modify the automatically created classMainWindowby adding methods, member variables, and so on, to it.At the beginning of the file, before the class definition, you can see the namespace
Uienclosing the classMainWindow. (Namespaces can be used to define visibility areas, but knowing them is not required on this course.) When referring to a class inside a namespace, you should use a specifier:Ui::MainWindow. This is different from the actualMainWindowclass declared in the file under consideration. The classUi::MainWindowhas those widgets as its attributes that you have used (or will use) in the filemainwindow.ui. Further, the actualMainWindowclass has, as its attribute, a pointer to the instance of theUi::MainWindowclass. This can be seen in the private part, at the end part of the file (the pointer*ui). Through this pointer, you have access to the widgets you need in your program.
mainwindow.cpp
This file does not (yet) include anything particularly exciting. You can find the definitions of the methods of the class that was defined in the filemainwindow.hh.
mainwindow.ui
The file contains the description of the user interface in so-called XML format. This file is not supposed to be edited manually. When a file is chosen from either the Projects list or from the project file menu, Qt Creator goes into Designer mode in which the user interface elements, the layout, and some of the functionalities can be designed interactively using the mouse. We will get to know this in the later section of the learning material.
If you have already opened the file
mainwindow.uiand moved to Qt Designer, you can return to the familiar view by clicking Edit mode on the dark left side menu. In the Edit mode, you can see what the XML description of a user interface looks like.

