Modularity
Modularity is a mechanism that divides a large program into small, more easily manageable parts when designing and implementing a program. If a program is modular, it has been divided into distinctly considered parts, and the result of their combined functioning is the final program.
Module is a whole consisting of cohesive programming structures. In most programming languages each module is implemented as a separate source code file, or a pair of source code files.
To some extent, modules are similar to classes: Each module has a public and a private interface. Classes and modules, however, are not the same thing. The only similarities are that both are used through their public interface. Also, if a class forms a distinct part of the program, it is often reasonable to implement it as a module, just like in the examples we are going to show you.
Mini example: geometry calculations
Let us study an example that shows us how to implement the basic, mechanical details of modules. The program of this example is a simple prototype of geometry calculator. It consists of two modules: a main program, and a module containing geometric calculations.
The main program module, located in the file calculator.cpp,
looks like this:
// Module: calculator / file: calculator.cpp
// Provides the main function for a geometry calculator.
#include "geometry.hh"
#include <iostream>

using namespace std;

int main() {
    double dimension = 0.0;

    cout << "Input the length of the side of a square: ";
    cin >> dimension;
    cout << "Perimeter: " << square_perimeter(dimension) << endl
         << "Area:      " << square_area(dimension) << endl;

    cout << "Input the radius of a circle: ";
    cin >> dimension;
    cout << "Perimeter: " << circle_perimeter(dimension) << endl
         << "Area:      " << circle_area(dimension) << endl;
}
In C++, each module providing services to other modules in its public interface needs a header file that describes all the services included in the public interface of the module.
In our example, the module geometry offers functions to the main program
for calculating the perimeter and the area of certain geometric shapes.
The header file of the module then consists of the declarations of the
functions required by the main program.
// Module: geometry / file: geometry.hh
// Header file of module geometry: provides the declarations for functions
// needed in calculations concerning geometric shapes
#ifndef GEOMETRY_HH
#define GEOMETRY_HH

double square_perimeter(double side);
double square_area(double side);

double circle_perimeter(double radius);
double circle_area(double radius);

#endif // GEOMETRY_HH
Now, at the latest, is the time to notice that the main program module
(calculator.cpp) contains the line
#include "geometry.hh"
This is the directive of the preprocessor that tells the C++ compiler
that a module is using services from the public interface of another module.
Having added the line #include at the beginning of the file
calculator.cpp, you can call the functions declared in geometry.hh
even if their definitions are located elsewhere.
A preprocessor is the part of the compiler that prepares the files before
the actual compiling.
Basically, the preprocessor only replaces text with other text, such as
replacing the line #include "geometry.hh" with the contents of the file
geometry.hh.
Because #include merely joins the files as part of a file that will be
compiled, it is possible for a file to be included several times,
and the overlapping definitions prevent compilation.
The problem can be solved by writing
the directives #ifndef, #define, and #endif in the header file
as shown in the code above.
They let the preprocessor know that the contents of a file will only be
included in the compiled file once, regardless of how many times it is
attempted to include them.
According to the example, after the lines #ifndef and #define,
there is the name of the header file in question, written in capital letters,
and with the period replaced with an underscore character.
This is a common stylistic habit in programming,
and you should follow it as well.
There is usually no need to write a separate header file for the main program module because it does not offer services to other modules.
The implementation file geometry.cpp includes the definitions of
the functions declared in the module’s public interface, and the assisting
services of the private interface they need.
// Module: geometry / file: geometry.cpp
// Implementation file of module geometry: provides the implementations
// for functions needed in calculations concerning geometric shapes
const double PI = 3.141593;

double square_perimeter(double side) {
    return 4 * side;
}

double square_area(double side) {
    return side * side;
}

double circle_perimeter(double radius) {
    return 2 * PI * radius;
}

double circle_area(double radius) {
    return PI * radius * radius;
}
Compilation phases of the geometry calculator
Qt Creator will make sure the programs are compiled correctly. We will now study the phases of compiling a program. We will compile the geometry calculator you saw above using the command line, because this way, you can see the phases better.
Copy the directory examples/10/geometry into the directory
student for compilation.
You can see that this directory does not include the Qt Creator file .pro.
The simplest way to compile the program is to go to the directory containing the files and write the command:
g++ calculator.cpp geometry.cpp
Please note that you have not the file geometry.hh in your
compiling command. Why not?
This file will be taken in compilation because the preprocessor
includes its contents in the file calculator.cpp.
If you list all the files after the command, you can see the file a.out
in the directory.
This is an executable program (binary).
You can execute it on the command line by writing the command:
./a.out
This compilation process, while being the simplest possible, does not reveal
more about compilation phases than if you did it in Qt Creator.
Delete the binary file (the command you need is rm) and
start over to compile phase by phase.
The figure above shows the compilation phases of the geometry calculator.
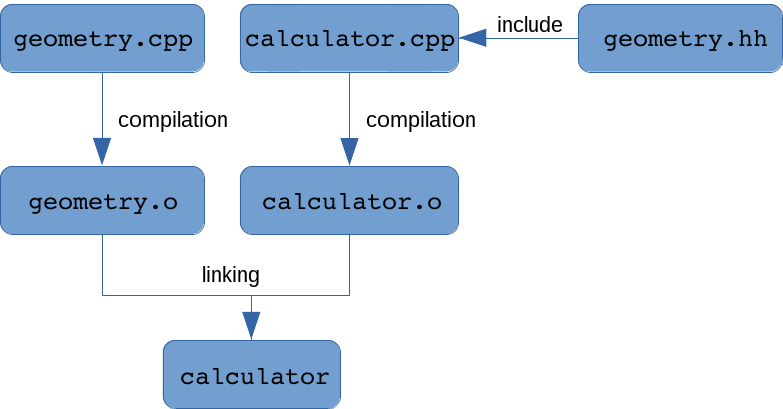
First, we only compile the file geometry.cpp.
You can do it with the command:
g++ -c geometry.cpp
Here, the command line parameter -c (compile) lets the compiler know
that we are only going to compile, not link.
If you list the files after that, you will see that the file geometry.o
has appeared in the directory.
This file includes machine code, but you cannot execute it alone because
it does not contain a complete program.
As you might know, the file geometry.cpp does not include the main
function at all, for example.
Next, we will compile only the file calculator.cpp,
with a similar command:
g++ -c calculator.cpp
After that, you have two object files with the extension .o in the
directory.
The last phase of compilation is that you combine the object files into an executable file. You can do it using the following command:
g++ calculator.o geometry.o
If you want to name the binary something other than a.out, you can
give the parameter -o name to the compilation command, for example:
g++ -o calculator calculator.o geometry.o
When compiling large programs, it can make things easier if you separate the compiling and linking phases. This way, the programmer will always know which stage gave the error message when executing the compilation.
Qt Creator uses a program called make to automate the compilation.
It is also possible to use make from the command line.
If you end up working on a project that is compiled and executed from the
command line, you should familiarize yourself with make.
More complex example: bus timetables
See the directory examples/10/bus_timetables and find the program located
in it that asks for the time and bus number, and then prints the three
closest departure times of that bus.
(This directory does not include the Qt Creator file .pro either,
which means
you have a chance to practice compiling a program from the command line.)
The program consists of three modules:
timetable.cpp
The main program module includes the initialization of the
Timetabledata structure, a very simple user interface, and the search of bus departures, based on the time and bus number the user has given.It uses the services in the public interfaces of both the module
timeand the moduleutilities.
time.hh + time.cpp
The module defines the class
Time, making it possible to handle times: initializing, setting, reading from the keyboard, printing, and comparing (less or equal) two objects of the typeTime.It uses the services in the public interface of the module
utilities.
utilities.hh + utilities.cpp
The module provides the functions to transform a string into an integer, and to read an integer from the keyboard. The services offered by the module are somewhat miscellaneous functions that cannot really be included in a more suitable module.
It does not use the services offered by the other modules.
The program might seem complicated at first, but apart from a couple of
sections, it does not contain anything new.
The sections containing new things are marked with the comment //***,
and we will explain them here:
Line 52 in the file timetable.cpp
You should remember that the easiest interpretation of a reference is giving a nickname to an existing variable. From this point of view, the definition
const vector<Time>& timevec = iter->second;simply means that from now on, the name
timeveccan be used to mean the same thing asiter->second. The definition makes it possible to simplify the code, and diminish the trouble of writing.The word
constis included here becauseiterpoints to theconstcontainertimetable, which you can only handle as constant.
Line 7 in the file utilities.cpp
The reserved word
namespaceis used to create a private interface for the module, whose services can only be accessed from within the same module (source code file).All the declarations and definitions enclosed by the curly brackets after the reserved word
namespacecan only be used in the fileutilities.cpp.An unnamed namespace of a module is equivalent to the
privatepart of a class.
Line 11 in the file time.cpp
This is the first example of a class constructor where the initialization of an object does not happen in the initializing list but in the commands located in the body of the constructor. There is nothing odd to this in itself, since the constructor is a function, and its body can contain commands when necessary.
However, with the know-how you have at this point of the course, there is a problem with the implementation of the constructor of the class
Time: What should be done if the parametertimeis not correct? The functionset_valuedoes return the valuefalsein that kind of a situation, but the constructor cannot use that value because it does not have a return value itself.The correct solution is to create an exception, as we did in Python in similar situations. We just cannot yet do it in C++ (but you will learn it only on the next programming course).
Everything else in the examples should already be familiar to you. We may have used some of the mechanisms you learned earlier in some creative ways, so you should pay attention when you read about them.
Module’s public interface (.hh file)
The public interface of a module (this means the services one module
provides for other modules) is written in the header file of the module
which is traditionally named with the extension .hh in C++.
A public interface can contain:
- declarations of functions
- definitions of constants
- definitions of new data types (also classes)
- any combination of the above things.
A public interface must not include:
- definitions of variables
- definitions of functions or methods.
Each source code file that needs a service from the public interface of another module has to have the line
#include "module_proving_services.hh"
Even if it was not necessary to do this in the example code, it might be
necessary to put this #include line into the .hh file of a module
as well.
In what kind of a situation would you have to do that?
Also, it is common that the .cpp file of a module has to
include its own .hh file (see the time.cpp file
in the example). Why is this necessary?
You must not use the directive #include for including
.cpp files.
Even if that might work in some situations, it is a sign that the programmer
is largely ignorant of how to use module mechanism.
With regard to programming style, it is considered good policy to include your own modules first when a module includes both the modules written by the programmer and the standard libraries of the system, as below:
#include "my_module_1.hh"
...
#include "my_module_n.hh"
#include <standard_library_1>
...
#include <standard_library_m>
This way you will ensure that the compiler checks whether the self-written
modules have all the include files you need.
In other words, you make sure that your own modules form a compilation unit
that can be compiled independently.
When working with complex programs, you often face the situation where one
.hh file is included several times because different
source code files execute the #include command to it to fulfill
their own needs.
In certain situations, that leads to problems.
You can work around this problem as explained at the beginning of this
material section when the mini example on geometry calculations was
considered.
Module’s private interface (.cpp file)
The implementation file, or the .cpp file, defines all the functions and
methods that were declared in the module’s public interface in the
header file. The implementation file can, for certain, include any code that
is necessary for implementing the functions of the public interface.
If you want to implement some assisting functions of the module
itself in the .cpp file, and want to make sure you cannot find a way
to call them from other modules,
you must declare and define them within the unnamed namespace:
namespace {  // Declaration part
    void private_function_of_the_module();
    ...
}

...
// the function definitions of the public interface are here
...

namespace {  // Definition part
    void private_function_of_the_module() {
        ...
    }
    ...
}
As you know, the declaration part can be omitted if you arrange the function definitions in such an order that enables the compiler to see the function definitions before you try to call them.
The way to do this is to move the definition into the beginning of the file,
as we did in the file utilities.cpp, starting from line 7.
The mechanism of the unnamed namespace presented above
only works with the regular functions.
Instead, if you define methods of a class in the .cpp file,
the namespace mechanism has no meaning, because a class uses the
public and private mechanisms to manage its interfaces and scopes.
In the module’s public interface (the .hh file), if there are
definitions of constants or data types that you
need in the .cpp file of the module as well,
you have to include the module’s own .hh file.
The programmer can also define named namespaces:
namespace my_space {
    void my_function() {
        ...
    }
}
You can call functions like these in two ways; either
my_space::my_function();
or by adding the command using namespace into the code file
using namespace my_space;
...
my_function();
You will probably not need to implement a named namespace on this course, but it is a nice explanation to the frequent code snippet
using namespace std;
You can avoid name conflicts by using named namespaces.
For example, the identifier name could be used in a student database
both in student information and in course information.
After implementing both in their own namespaces, you could access
them as Student::name and Course::name.
How to design modules
In a real programming project, you divide the program into modules at design phase. Basically, you can find the modules when you consider what the logical sub-parts of the program you are implementing are.
The bus timetable program we used as an example is almost laughably simple and so small that the module division barely benefits us at all, but off the top of our heads (before coding anything), we thought of these:
- The program must be able to handle and compare clock times.
- Because it must be able to read numbers presented in different forms from the keyboard and conduct changes between strings and numbers, it seemed pretty clear that we need a set of functions that will manage the numbers put in by the user.
- We also need a very simple user interface.
- Also, we need an algorithm that is able to get the suitable bus departures from the data structure the program is using.
Finally, mostly for technical reasons, we decided to implement the user interface and the search algorithm as the main program module, and the two others as modules of their own, which leads us to the final module division of the program:
- module for the main program (
timetable) - module for time management (
time) - an assisting module for number management (
utilities).
The goal in finding the modules is to divide the program into parts, each of which:
- implements a distinctly divided part of the whole, and
- is simple enough (what if it is not?).
If the problem is on the larger side, you can look for the modules by splitting the problem and splitting these sub-problems into even smaller parts, until you have sub-problems that are small enough to be easily managed. This approach is called the top-down method.
Here are some common guidelines for entities you should usually implement as modules when working with programs of the same size as the ones on this course:
- class
- main program
- user interface or handling a complex input
- reading and analyzing a file
- common algorithms (searching, sorting).
Imagination helps a lot.
Note that we could have implemented the modules of the bus timetable program as classes with their public and private interfaces. Classes are the most typical examples of modules in C++ programming.
Designing the public interfaces of the modules is more challenging than designing the modular division.
Especially after gaining some experience, you are usually able to see the modular division almost immediately when working with programs of the size of the ones on these basic courses.
When designing a public interface, you need to take a much firmer stand on the services a module is going to provide for others, and how it will do it. In order to do that and succeed in some way, you will need to consider the structure of the program and its implementation quite carefully.
If an interface has been designed the ideal way, each module provides services to other modules in its public interface, which you do not need to edit while the project advances. Such a successful result is rarely seen. In practice, as the project proceeds, you always encounter situations where you understand that something was done badly in the interface, or that something was forgotten from it completely. In these situations, you must change the interfaces, and it can get expensive if someone has already been busy writing a lot of code based on the imperfect interface. The changes on the interface are reflected everywhere it has been used.
Benefits of modularity
The benefits of modularity are mostly the same as the benefits of classes, because they mostly stem from the use of interfaces:
- The implementation of a module (that is, the
.cppfile i.e. the private interface) can be modified while the public interface stays intact. - The parts of the program that logically belong together can be combined in the same package, which simplifies the program and makes its testing and managing easier.
- The modules can be developed in the project side by side after agreeing on the public interface.
- Modularity is a good tool in managing large programming projects.
- Often, you can reuse whole or partial modules.
- Most programming languages that support modularity allow you to compile modules separately. This speeds up the developing, and uses less resources, since after completing the changes, you only need to re-compile the modules that were modified.