(E) Body mass index
Goal: I will learn to create a simple dialog using Qt Designer, and to understand the signals & slots mechanism of Qt.
Instructions:
Create a new project: student/11/bmi/.
Create the new project according to to the instructions in the previous material sections.
Your task is to use Qt Designer to implement a dialog that looks like the figure below.
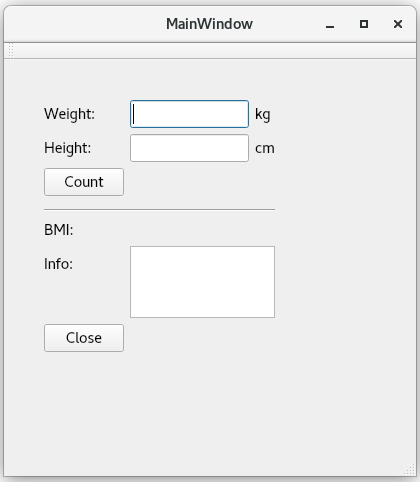
After the user has given their weight and height readings and
clicked the Count button, the program counts the body mass index.
After that the dialog will look, for example, like below.
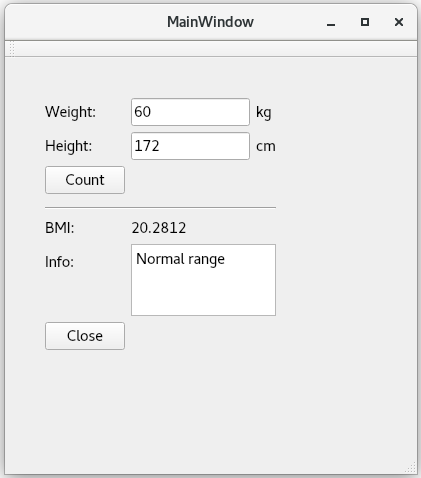
On the right from the label BMI, there is another label,
which is first empty but after clicking the Count button,
it shows the body mass index.
If the user gives zero or no value for the heigth, body mass index cannot
be counted (it would lead to division by zero).
In such case, the aforementioned label shows the text:
Cannot count
On the right from the label Info, there is a textBrowser component,
to which will be printed one of the texts:
UnderweightOverweightNormal range
Moreover, if the body mass index cannot be counted, nothing will be printed to the aforementioned textBrowser component.
Body mass index (BMI) can be counted from the formula:
The lower bound of normal weight is 18.5 and the upper bound is 25.
Instruction to pass automated tests
Use the following object names for lineEdit widgets:
weightLineEdit and heightLineEdit.
For these widgets, automated tests allow only the signals
editingFinished and textChanged.
For buttons, use the object names:
countButton and closeButton.
For the label, in which you print the body mass index, use the object
name resultLabel.
For the textBrowser widget, in which you print the information about
underweight, overweight, or normal weight, use the object name
infoTextBrowser.
If desired you can complete the assignment in the following phases:
First, construct a dialog resembling the figure above. When you have created the project according to the instructions in the previous sections, Qt generates some of the program code of the classes. You can see the point Forms in the file list on the left, and below that, the file
mainwindow.ui. By clicking the name of this file, you turn to Qt Designer where you can build the dialog by dragging the necessary user interface components to suitable places. By selecting a component (either in the drawing area or in the Object list on the right) and by right-pressing the mouse, you can see a menu, from which you should selectChange objectNameto give the names mentioned in the box above.If you want to test the created functionalities as soon as possible, you can now implement the closing of the dialog. You can do this in Qt Designer by opening the Signals & Slots Editor. Click the plus sign to use the menu to add signals and slots. The selections you need:
- Sender: Close button
- Signal: clicked()
- Receiver: MainWindow
- Slot: close()
Here, we already defined one signal-slot connection. It is not this simple with the other connections.
Now, you can try how to read input (weight and height). Here, you again need the Signals & slots mechanism. When you click the lineEdit component, it opens a menu where you can select
Go to slot .... Now, Qt generates the declaration of the slot function in the fileMainWindow.hhand the corresponding empty function in the fileMainWindow.cpp. Your task is to write the body of this function.You can check if the reading was successful by printing the text that was read into the
qDebug()stream that can found from theQDebuglibrary.Please note that you can write any C++ code in the generated classes. You can, for example, add attributes and methods.
After you have made sure that you can store the input data, you can implement the counting algorithm. You need just usual C++ code to do that.
Tips for completing the assignment:
It should be possible for you to complete this assignment using the example we showed you in the lecture. However, if you did not understand the phases above, it is recommended that you take part in the weekly exercises or go to Kooditorio.
Recall that as a default, the program will be compiled into a
build-directory. So, for testing purposes, you can move possible input data files to this same directory.If your program does not pass automated tests, ensure that there are no compiler-generated files in your central repository (see Plussa at 1.1.3 Automated tests). Note that compiler-generated files can also begin with a dot.
Before printing an integer value, you most probably need to convert it to a
QString. This can be done as follows:int x = 0; QString s = QString::number(x);
A+ presents the exercise submission form here.