Moving circle
We have provided you an example to help you in implementing the project
on this round.
You can find it from examples/12/moving_circle2.
The program uses QGraphicsScene, on which you draw different shapes.
In this case, we used it to draw a circle.
In the project, you can use it to e.g rectangles.
Moreover, the program uses a timer that enables an action to be done repeatedly (e.g. once in a second). In the example, the circle makes a small move at a time, until it crashes a border of the drawing area.
Below we will consider only those properties of the program that are important from the point of view of the project.
Graphic scene and moving
The user interface contains a graphicsView widget, on which the
graphic scene is put.
Again, a circle is added on the graphic scene.
The circle moves diagonally based on the given directions that can be
right/left and up/down.
If the circle hits the boundary of the moving area (graphic scene),
it stops until the user
changes the direction such that it can move again.
To understand location data in the code, see the figure below.
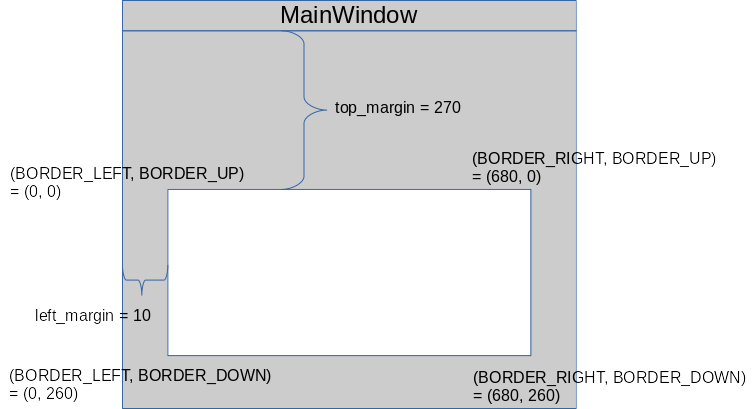
The coordinates in the figure mean the corner coordinates of the white
rectangle (drawing area).
The variables (top_margin and left_margin) in the figure are
not needed in drawing.
However, the figure provides a good place to show what they mean.
It is also possible to make the circle move vertically upwards (to the north) or downwards (to the south). This kind of move is implemented with key commands. In the example, diagonal move happens automatically (with a timer), while vertical move is controlled by the user.
There is also a key command to change the color of the circle between red and blue.
Push buttons vs. radio buttons
The example program has both push buttons and radio buttons for selecting
directions.
Radio buttons are more suitable for this kind of selection.
However, push buttons are provided, since your may need a similar kind of
action in the project work.
In addition, the example shows how the chosen option can have effect
on how the program behaves.
In special, the values of the attributes is_down_ and is_right_ are
used for this purpose.
Note that no connect commands are needed to make these widgets to work
consistently.
(However, there is a connect command for another purpose.)
Enabling/disabling buttons
As a user of graphical user interfaces, you have seen that buttons can be
sometimes in such a state that you cannot click them or clicking has no effect.
In this example, clicking the move button is disabled, if the circle is already
moving or if the circle hits the boundary of its moving area.
Therefore, we have called the function setDisabled or
setEnabled that
can be found in the most of the methods of the class MainWindow.
In the project, all actions are not always possible. The widgets meant for actions that are impossible at the moment should be disabled. In the case of key commands, you can print a warning, if the user tries to execute a command in an inadequate situation.
Timer
The example program uses timer in a similar way than the timer
exercise on the previous round.
However, the constructor of MainWindow defines the timer as non-single-shot,
which means that it fires once in the given time interval.
(Here the interval is 1000 milliseconds, i.e. one second.)
In fact, setting the timer as non-single-shot is not necessary, because this is the default property of the timer. This property is still worth noticing, and you can try how the moving of the circle changes if you change the type of the timer.
With the moving circle, the timeout signal is connected to the function
circle_move.
In that function, the timer is stopped when necessary.
This is easiest to implement with parameterless functions.