FXML
When implementing user interfaces with JavaFX it soon becomes apparent how laborius designing them can be. The locations of user interface nodes is defined with pixels and containers which is slow and requires quite a lot of code. Designing graphical user interfaces is also often done in parallel with the implementation and design of the functional code and the actual UI is not necessarily implemented by its designer. To make designing user interfaces smoother it is possible to define the UI with FXML markup language in JavaFX. Note! FXML is only shortly introduced here but it not necessary to use it on the course. There is also a course available on designing user interfaces: COMP.CS.210 Creating Graphical User Interfaces. As FXML can be more fluent especially when implementing programs with several windows in use, it is introduced here.
In NetBeans a JavaFX project that uses FXML is created with:
Creating a simple FXML project in NetBeans
New files are created under the src directoty:
Tha main class of a JavaFX program e.g.
App.javathat acts as the implementation of the JavaFX programFiles for implementing the event handlers e.g.
Controller.javaResource files for each window needed e.g.
example.fxmlwhere the UI is defined
Let’s first take a look at the simple main class:
@Override
public void start(Stage stage) throws IOException {
    // Using the FXMLLoader class to get the contents of the scene from the FXML file
    FXMLLoader fxmlLoader = new FXMLLoader(App.class.getResource("example.fxml"));

    // create the scene fo rthe window
    // and load the window content defined in the FXML file into it
    Scene scene = new Scene(fxmlLoader.load(), 640, 480);
    stage.setScene(scene);
    stage.show();
}
The FXML files are located in NetBeans under Other Sources.
By choosing edit for the FXML file in NetBeans you can define the neede user interface directly with markup.
Our simple UI contains one button with an event handler called printText.
It says “Hello World” on the button.
In addition above the button there is a text field with the text “Press the Button” above it for showing the output.
All nodes are placed vertically inside a VBox.
The example.fxml defining the window is:
<?xml version="1.0" encoding="UTF-8"?>

<?import javafx.geometry.Insets?>
<?import javafx.scene.control.Button?>
<?import javafx.scene.control.Label?>
<?import javafx.scene.layout.VBox?>
<?import javafx.scene.control.TextField?>

<VBox xmlns:fx="http://javafx.com/fxml/1" fx:controller="prog3.fxmlexample.Controller">
<children>
    <Label fx:id="label" text="Press the Button" />
    <TextField fx:id="field"/>
    <Button fx:id="PrintButton" onAction="#printText" text="Hello World" />
</children>
<padding>
    <Insets bottom="20.0" left="20.0" right="20.0" top="20.0" />
</padding>
</VBox>
fx:id defines the name of the node. For the buttons onAction event printText is set as the event handler.
The event handler itself is implemented in the controller file set for the container.
In our example is it Controller.java.
package prog3.fxmlexample;

import java.io.IOException;
import javafx.fxml.FXML;
import javafx.scene.control.TextField;

public class PrimaryController {

    // to be able to use the text field
    // it needs to be initialized with the same name as in the FXML file
    // @FXML annotation is used to mark the member variables
    // and methods used in the markup
    @FXML
    private TextField field;

    @FXML
    private void printText() {
        // set the text into the text field
        field.setText("Hello World!");
    }

}
Instead of editing the FXML directly the user interface can be desinged with Scene Builder.
If Scene Builder is installed opening the FXML file (in NetBeans Open), the FXML is opened in Scene Builderissa for editing.
There user interface elements and containers can be graphically placed to desing the window.
In Scene Builder our example.fxml looks like:
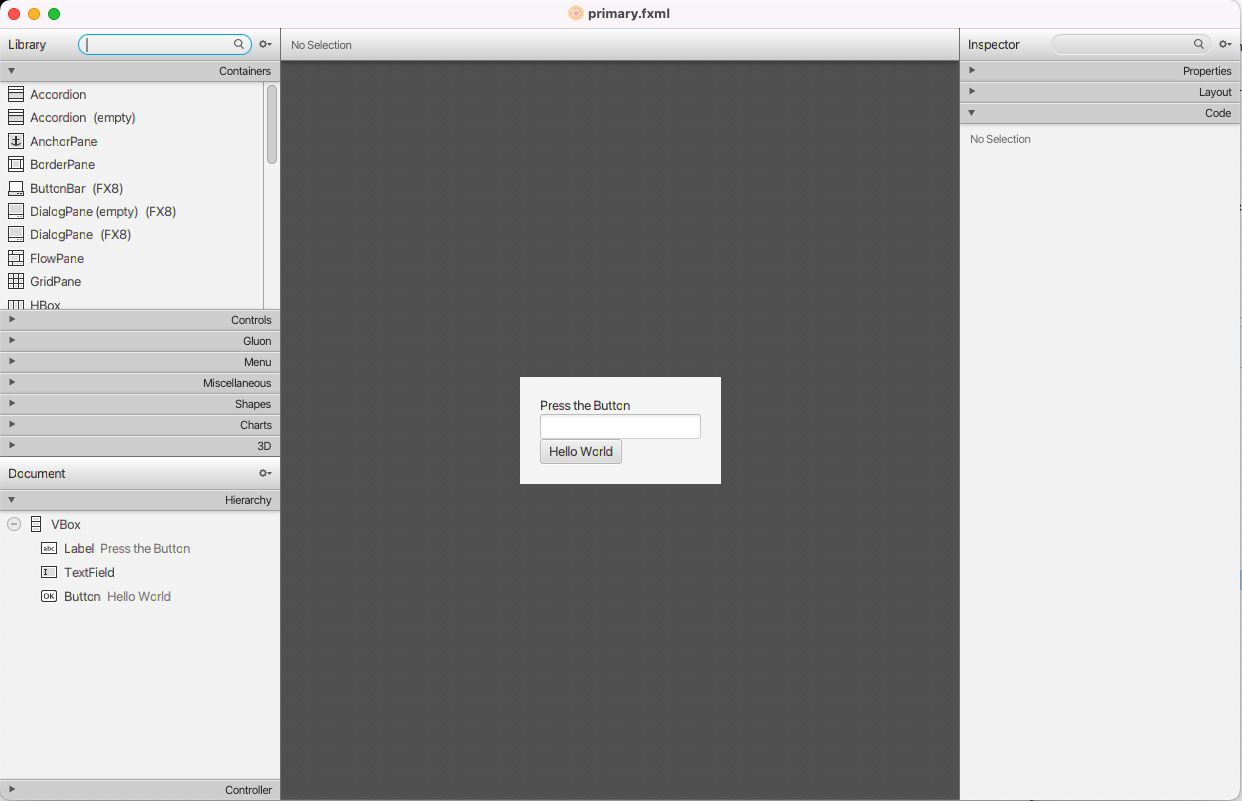
Scene Builder view to FXML file
On the left side of the Scene Builder window containers and nodes that can be dragged with the mouse into the desired location on the UI. When you select the button in Scene Builder under the Code menu on the right its events and handlers defined in the controller file can be connected to them.
It is possible to define the event handlers in the FXML file. From the point of view of keeping the UI design separate from its implementation it is however reasonable to use a separata java code file for their implementation.
Programming demo (duration 14:03)