About SSH keys
Note
You will find this material interesting because after setting up an SSH key, you no longer need to put in your password at every Git action you do to the central repository.
On the other hand, if repetitive password writing does not bother you, you can skip this section (or return here later).
SSH (Secure Shell) is an encrypted network protocol. With it, you can encrypt your file transfers or remotely use another computer via a command line console.
You can access SSH in Unix operating systems from the command line
with the command ssh.
The most popular program for Windows operating systems is PuTTY,
and you can download it for free at http://www.putty.org/.
You can access university servers over an SSH connection with your
own intranet username and password.
It is possible to use Git over the SSH connection after you
have defined your SSH key.
SSH keys are used for identification on servers without the input of a username and a password. To prepare for identification, the user creates an SSH key pair on their computer. The pair consists of a public and a private key. YOU MAY NEVER SHARE THE PRIVATE KEY! Always keep it secret. You set the public key to the list of legal keys on the server. After that, you can identify yourself to the server on a computer using a private key that is joined with the accepted public key.
Here is an example of how you can create an SSH key in the university Linux environment:
On the command line, insert the command:
ssh-keygen -t rsa -b 4096 -C "teemu.teekkari@tuni.fi"
The program asks for the creating path of the keys. Use the default path (press enter).
The program asks for a password for the key. Create a key that does not require the use of a password (press enter).
The program asks you to confirm the password. Repeat the same as previously.
You have now created an SSH key. The private key has been saved in the file
~/.ssh/id_rsa, and the public one in the file ~/.ssh/id_rsa.pub.
Your next step is to save your SSH key into your central Git repository. You can do that in the settings of the web interface. Note that settings can be found from two places: The avatar at the top on the left side is for editing your own profile and general settings, and the gear icon at the bottom of the left menu is for editing the settings of a specific project. Now go to your own general settings by clicking the avatar.
Select Preferences -> SSH Keys.
(Now SSH Keys is located in the menu on the left.)
Follow the instructions in the text field and copy the contents of the file
~/.ssh/id_rsa.pub into the text field in question.
Be careful to include the line from the beginning to the end.
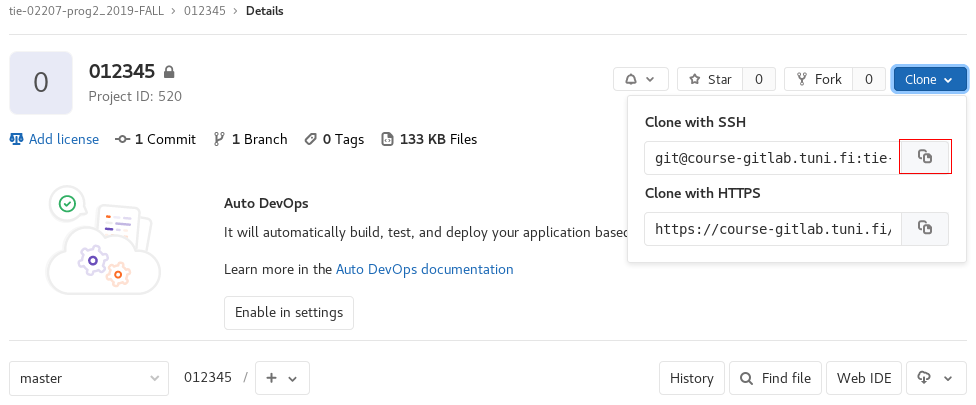
After adding the contents of the file, you can use remote addresses beginning with ”git@course-gitlab.tuni.fi:”. If you have cloned over HTTPS before, you will have to replace the origin with a new remote. First, go to your own repository. Write the following command:
git remote set-url origin <url>
and replace the string <url> with the key in the web interface of your repository:
You can check the success of your previous command by writing the following command:
git remote -v
If you did not set a password on your SSH key, you can use Git without inserting your username or password at every push and pull operation.
More detailed information about SSH can be found from https://en.wikipedia.org/wiki/Secure_Shell.
If you are interested in authentication methods or the principles of RSA key pairs, it is worth to take the course Computer and Network Security :)
Nice to know: if you want to use servers over an SSH connection on other
occasions as well,
you can add the contents of the file id_rsa.pub to a server of
your choice in the file ~/.ssh/authorized_keys.
If you want to make your life easier, please see the tips below:
Tip 1: Different keys to each different server. We recommend this strongly.
In the SSH config file (in the path /home/<username>/.ssh/config), add the following settings:
Host tiha
 Hostname linux-desktop.tuni.fi
 user <username>
 IdentityFile /home/<username>/.ssh/ed_tut.key

Host laptop
 Hostname mavan.laptop.security.tut.fi
 user <username>
 IdentityFile /home/<username>/.ssh/ed_laptop.key

Host github.com
 Hostname github.com
 User git
 IdentityFile /home/<username>/.ssh/github.key
How to use:
user_id@computer_name:~$ ssh tiha
Tip 2: Proxyjump: How to forward the SSH connection onwards from one computer, for example, if you can only access the laptop via linux-desktop. Add to config file:
Host tiha
 Hostname linux-desktop.tuni.fi
 user <username>
 IdentityFile /home/<username>/.ssh/ed_tut.key

Host laptop
 Hostname mavan.laptop.security.tut.fi
 proxyjump tiha
 user <username>
 IdentityFile /home/<username>/.ssh/ed_laptop.key
How to use:
user_id@computer_name:~$ ssh laptop
The computer creates the SSH connection first to the target ”tiha” and then through the existing tunnel to the target ”laptop”.