Programming assigments and programming environments
Note on environment details
Please note that all the details in this document is for the official course environment (linux-desktop.tuni.fi). We can not test the system in all the different environments, so some details might be different on your own computer.
General info
The programming project will be done in 2 stages. In each stage the students will be given a description of the problem(s) that should be solved and instructions. In each stage the student must produce C++ code that solves the problem(s) and a short documentation. When the C++ code and the documentation are ready the student should submit them according to the instructions.
Each student must produce and submit his/her own code. Copying code from the internet or from some other student is strictly forbidden.
Passing Stage 1 is compulsory for completing the course. Stage 2 is not necessary for completing the course, but failing to reach the minimum requirements will have considerable effect on student’s course grade. More details on grading and minimum requirements are shown in the front page.
How much work it takes to complete the project will vary from student to student, however completing the project will take considerable time. If you start the project a week before the deadline, you will most certainly run into problems. Start planning and coding well in advance of the deadline.
When a date is specified as a deadline, the student must submit his/her work on that date before 23.59 o’clock. (If you wait until 23.55 before starting to submit your code and report, you will most certainly run into problems.)
Programming environment
The programming environment is the same used in course COMP.CS.110 Programming 2, i.e. C++, User Interface with Qt (which is provided by the course) and version control with Git.
Using your own machine
Since the programming assignment involves testing the performance of you code, perhaps the easiest way to do the assignment is to use your own machine and install QtCreator development environment and Gcc compiler on that machine. That way other people’s programs don’t interfere with your work and performance tests. You can download Qt development environment for free from https://www.qt.io/download (choose ”Downloads for open source users / Go open source” and in the lower half of next page the button: ”Download the Qt Online Installer”).
- Note 1: The Qt Download needs you to create a Qt user account. You can use your universitu email for this.
- Note 2: Even if you develop your assignment on your own machine, make sure it compiles and works on our remote desktop (see below), because that’s where TAs check your assignment.
- Note 3: If you already have an older version of QtCreator+Gcc installed on your machine, make sure it is new enough to support C++17. It’s advisable to upgrade your installation.
If you have problems, there’s more instructions on the Programming 2 course pages.
The following configurations have been made sure to work (if you install the latest Qt 6, that should also work fine):
- Windows 11 Qt 6.2.4 and it is important to have MinGW version 11.2.0 (that means not 8.something but 11.something), select between 32-bit and 64-bit according to your system, usually 64-bit is the one you want
- Mac OS with ARM-processor: Qt 6.6.0 (of course you need to install XCode or XCode command line tools before this)
- Linux (more specifically Pop!_OS 22.04 LTS with Linux kernel 6): Qt 6.2.4
Remote desktop (virtual machine) for programming
If you wish, you can also use remote desktop to virtual machine
linux-desktop.tuni.fi as your programming environment.
The virtual machine has Git, QtCreator and other editors, Gcc etc. for
programming.
Instructions on how to
connect to the remote desktop
can be found in Intra, and QtCreator instructions
on Programming 2 course documentation pages.
The final programming assigments should work in the remote desktop environment, as that is where assistants will evaluate your work. You can do the actual programming in any environment and any tools you wish, as long as the final assignment works on the remote desktop.
NOTE! When using the remote desktop, put your code into some folder under your ”normal” Linux home directory (/home/yourid/…), NOT under the shared Windows network folder (/intra/home/yourid)! The shared network folders do not work properly under Linux, and for example running your compiled program may be impossible there.
Git and Gitlab
Students of the course have access to GitLab https://course-gitlab.tuni.fi, where a remote repository will be created for each student for programming assignments. The repository contains code provided by the course as well as some test material.
If you are new to using Git, you can find information on the section Version control and Git in general of the Programming 2 course. Plussa also contains a whole self-study Git course.
Note that if you program using QtCreator, you can access Git functions directly from the menu Tools/Git. There you can do most common operation directly or start Git Gui from Tools/Git/Git Tools/Git Gui.
Getting the project from GitLab (cloning)
Here’s a brief summary. You can choose whether to use Git through the command line or with its graphical gui (git gui). Both of these options work in Linux and Windows and are available on linux-desktop. There are also third party Git clients like TortoiseGit, but they are not covered here (but use them, if you like).
Getting (cloning) the project from GitLab using Git Gui
Git provides you with a graphical user interface to access its functions. It’s not very pretty, but gets things done. And it looks the same both in Linux (like linux-desktop) and Windows.
- Start Git Gui from the Program menu/Start menu (or from command line with command ”git gui”). On Windows you can also start it by right-clicking on a folder where you want to clone your repository and choosing ”Git Gui”.
- Retrieve (clone) the repository by choosing ”Clone existing repository”. To ”source”, add the URL to your GitLab repository. To ”Target”, choose a suitable folder where you want create your local repository. Note! Git Gui requires that you give a folder that does not yet exist, so if you use ”Browse” to enter the folder, add ”/name-you-choose” to the end.
- If this is the first time you use git, you’ll have to set your name and email address (for commit messages). In Git Gui, choose Edit/Options and there User name and Email address (the global ones).
Getting (cloning) the project from GitLab using command line
If you are familiar with command line terminal, that’s the ”traditional” way to use Git. All Linux machines have this, and the Windows git comes with its own.
If this is the first time you use git, you’ll have to set your name and email address (for commit messages), and possibly also change the default text editor used to edit commit messages (the last one only for Linux users):
git config --global user.name "FirstName LastName"
git config --global user.email "firstname.lastname@example.com"
git config --global core.editor nano
Choose a suitable directory/folder for you work, and retrieve (clone) the repository:
cd suitable/directory/for/your/work
git clone https://URL-to-your-GitLab-repository.git
Getting new assignments and course updates to your Git repository
As the course progresses, there will be updates to code and tests provided by the course. Similarly new programming assignments will be distributed as updates. You will be notified about the updates with an email message, but if you’ve forgotten to read them, it’s a good idea to try to fetch updates from time to time, especially if you have a proglem, a missing file or similar. The instruction below tell how to configure the update ”upstream” repository and get updates to your git repository.
NOTE! In order to get updates to course files, it’s important that you NEVER edit main.cpp or the test files. Otherwise it’s really easy to get into problem when Git tries to merge your changes to course updates. If you really feel you must temporarily edit those files, copy them to new names first, and remember to return them to their original state before getting updates!
Getting course updates using Git Gui
- Start Git Gui. Choose ”Open existing directory” and choose your repository on your machine (where you cloned it). In Windows, you can also right-click on the folder and choose ”Git Gui”. Or in QtCreator, you can open your project and choose Tools/Git/Git Tools/Git Gui.
- IF you haven’t done so before, configure the course’s repository
as one of your remote repositories. In Git Gui choose Remote/Add…,
and to ”Name” enter ”upstream” and to ”Location” enter
https://course-gitlab.tuni.fi/compcs300-fall2023/student_template_project.gitThis has to be done only once for each local repository. (If you are using Git with ssh connection instead of https change the url togit@course-gitlab.tuni.fi:compcs300-fall2023/student_template_project.git) - Quit Git Gui and start it again (this is required for things to be updated).
- Fetch the updates from the course’s repository into your local repository by choosing Remote/Fetch from/upstream.
- Merge the updates (make them visible in your files) by choosing Merge/Local merge and clicking Merge. If Git Gui complains about ”invalid revisions”, there’s nothing to update (or some other problem).
- Push the updates to your GitLab repository. Choose Remote/Push and click Push.
Getting course updates using the command line is explained in week06 exercises
Compiling, testing, and submitting programming assignments
Compiling
Since the assignment has been written in C++, it must be compiled first, of course. Everyone can do this how they wish, for example:
- Use QtCreator, and compile, run, and debug your program there, with graphical user interface
- Use the Gcc compiler with command line terminal (or some other compiler), in which case the result will be a text-only version of the program (e.g., ”g++ -pedantic -Wall -std=c++17 mainprogram.cc mainwindow.cc datastructures.cc -o prg1”).
Testing
Your programming assignment has to work correctly with the public test data, but remember also to do your own tests and play with the user interface, because the public test cannot test everything that affects the grading of your work!
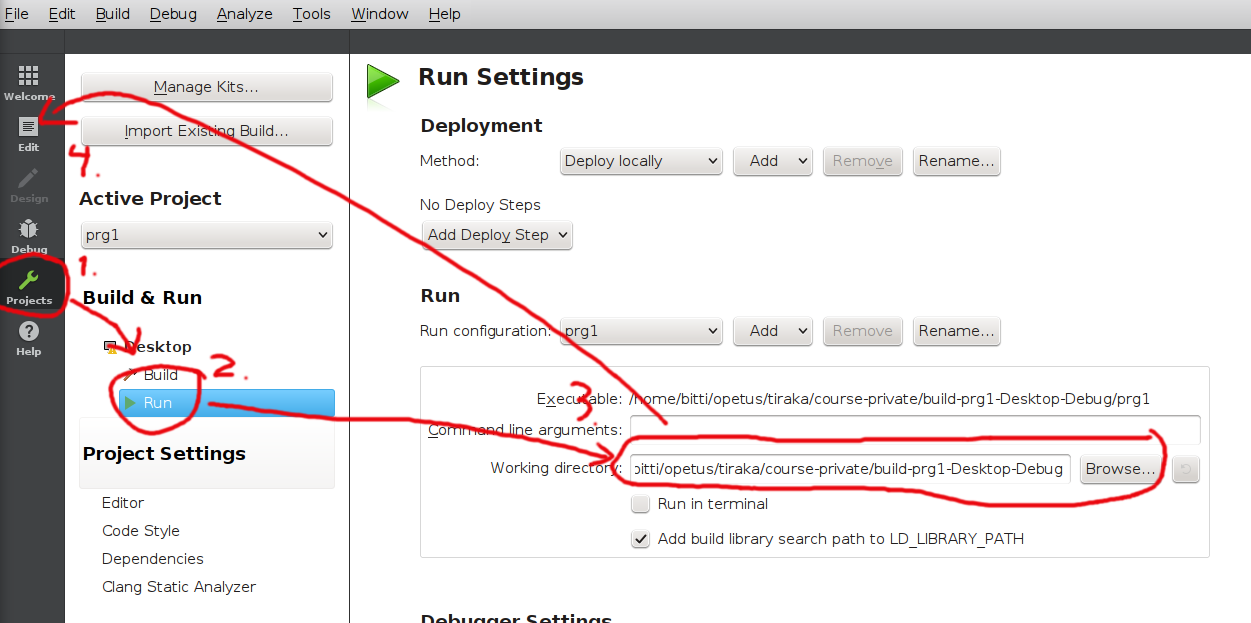
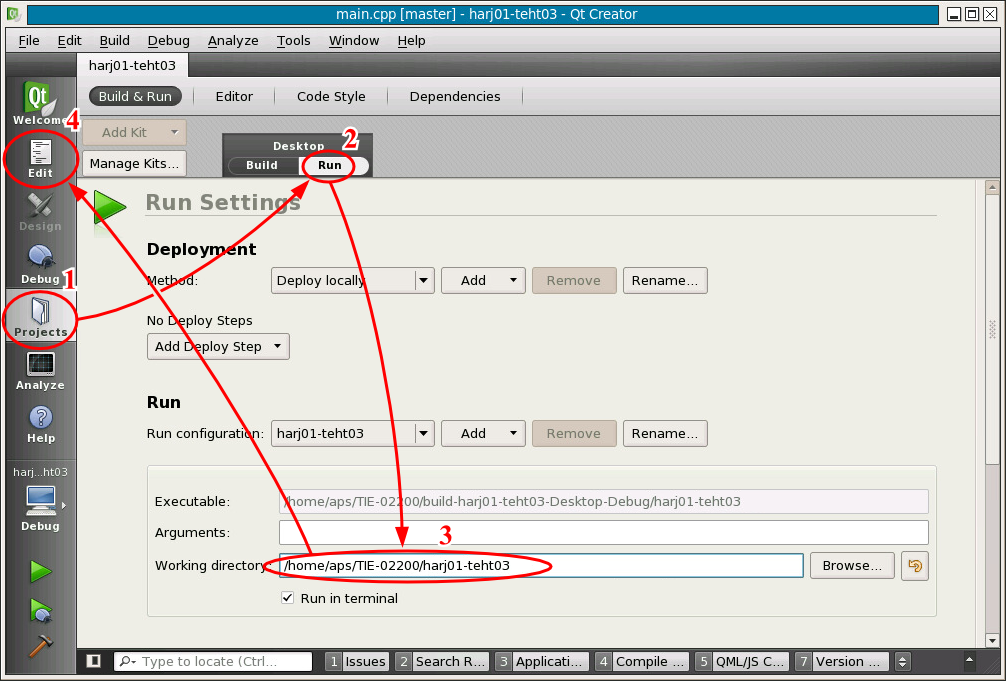
For test runs the program must be run in the directory/folder that
contains the testa data file(s). If you use QtCreator, you must first
configure the running directory for the project. In QtCreator, click on
the left panel Projects, and then ”Run” (in the Project view there’s a
selection Build / Run under heading Desktop). Now you should see section
Run, under which there is Working directory. Change that to the
directory where the code and the tests are.
(new QtCreator
and old QtCreator).
If you want to run the program using the command line terminal, go to the directory where the test are (command cd), and then run the program from the directory where it has been compiled/written to, i.e. ”./prg1” (in case of the compile command above). When using command terminal you can also give the executable a test file to run as a command line parameter (in which case the program terminates after reading and executing the test file): ”./prg1 example-in.txt”.
NOTE! The main program prints out to cerr ”Program ended normally” as the last thing if the program completes normally. If the printout doesn’t happen, it means that the program has crashed!
Debugging the use of STL
Iterator invalidation, over indexing and errors in using STL algorithms are common and cause often errors that are difficult to find. Fortunately gcc allows compiling the program in ”debug STL” mode, which adds additional checks for many STL-related errors (but not all). If those checks fail, the program is terminated with an error message.
In order to start using debug STL, the compiler just needs appropriate parameters, and the program has to be recompiled. To make this easier in QtCreator, the .pro-file of the programming assignments contain line ”#QMAKE_CXXFLAGS += -D_GLIBCXX_DEBUG -D_GLIBCXX_DEBUG_PEDANTIC”, which has originally been commented out. Debug STL is enabled by removing the comment character from the beginning of the line and recompiling the whole program (choose ”Rebuild All” from Build menu). (If you are using gcc without QtCreator, you can just add the ”-D…” parameters to the compiler command, i.e. ”g++ -D…”.)
Please notice that additional checks take time, so the performance of the program is slower when debug STL is enabled, often even asymptotically slower! So make sure you disable debug STL again before running performance tests (re-comment the line and rebuild)!
Tests provided by the course
You should of course test your code interactively yourself, and do your own command script files for repeating the same tests after fixes etc. The course will also provide you with some basic tests, which will be added here in time.
In the same directory/folder where the code is, there are some simple test files you can use. Fetch updates to your code from git, if the tests are not found. The file README.md in the top level describes the tests.
About the performance test
The purpose of the performance test is to give you information to analyse the asymptotic performance of your code. As explained in the assignment description, the test empties the data structure, adds an increasing number of elements, and then runs a given amount of random commands. The time for all this is measured.
Performance tests and their analysis is discussed on week 8 videos.
Submission
In this course, the return of exercises is used Git version control and Plus. The return is made as follows:
- Testing the functionality of the work is also your responsibility, so remember to test locally as well.
- Make sure all your code is added to git!! (git add, git commit)
- Update (push) your code once more to GitLab (git push origin)
- Use a web browser to go to Course-GitLab and make sure that all your files can indeed be found there and the content is correct! (Especially that the latest version must have been pushed to Gitlab, you can get this after making sure, e.g. by checking that on the front page of the Gitlab repository the latest commit message is correct).
- Send to Plussa only when everything is definitely saved in Git.
- Please note that the documentation check is also handled automatically using the docs/readme graders