TODO
Attention
This exercise should be done in groups and submitted as a group.
Include all group members and make sure that everyone knows how your solution works. Only one group member needs to submit the exercise on behalf of the whole group.
In this exercise, you build a simple TODO list application.
Download the template
Instructions


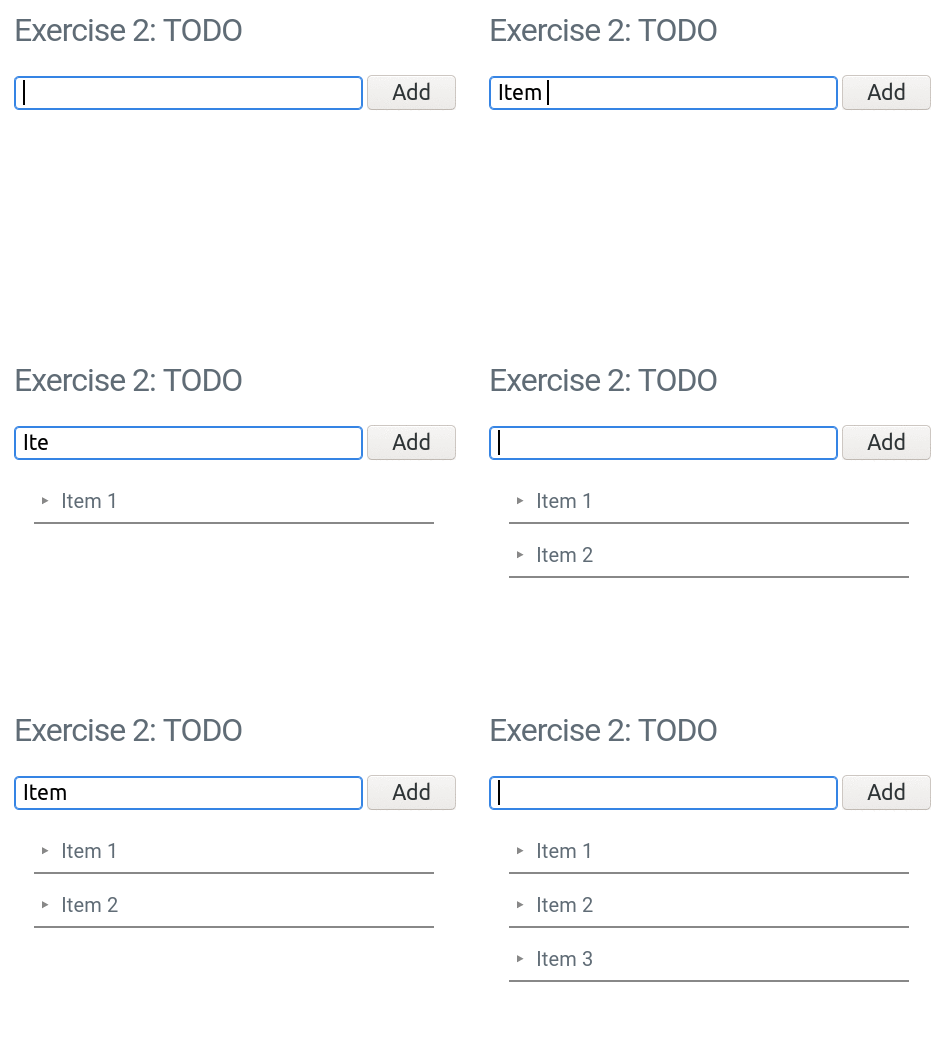
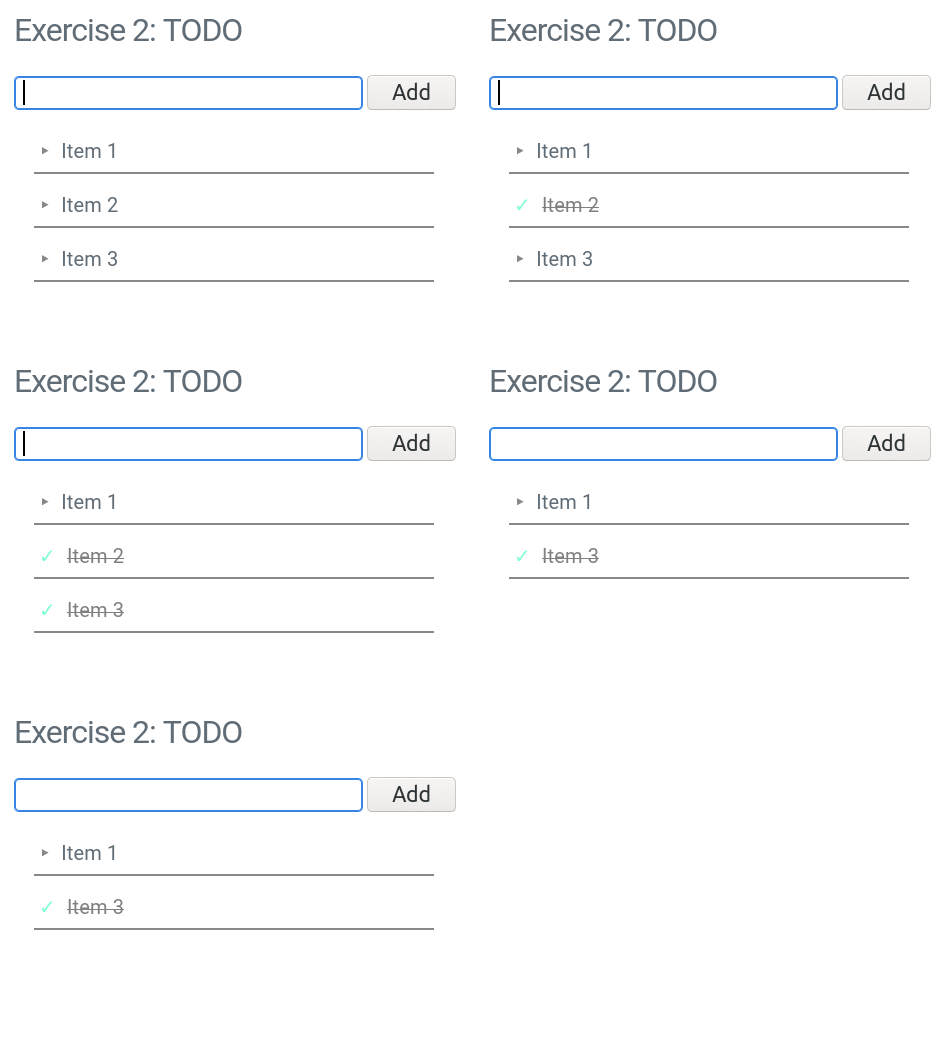
The images above illustrates the goal we are trying to achieve. The first image shows how the application behaves when you are adding items in the list. And the second image shows what happens when you click individual items in the list. New items are appended to the end of the list after you submit the form. At the same time, when a new item is added to the list, the input field is reset back to empty. Clicking an item marks it done and adds a CSS class “done” that causes the style of that item to be modified accordingly. If the same item is clicked twice, it will be removed from the list.
NOTE: The stages below are not all required and the end result is what counts. For more experienced JavaScript coders some of the stages may seem unnecessary but for others they should prove helpful when there are a few checkpoints included in between and some functions are built incrementally.
1. First start by downloading the template files. The HTML template takes care of loading the JavaScript
file and you don’t have to change anything else but the todo.js file. All your code goes inside the
todo.js file and this is the only file you submit in this exercise.
2. Again there are three important elements in the HTML file: the form input which has id “type-input”,
the target list ul-element which has an id “todo” and the form itself which has an id “form”. Your
first task is to get a hold of all these elements inside your code. Again you can use
document.getElementById() or document.querySelector().
3. Next you should implement the addListItem(text) function. It is responsible for creating new list items
(li-elements) and then adding them to the list. As you can see it gets text as its argument. This is the text
that the user typed in the input field. This function should first create a new li-element and then put
the text inside that element. Finally the function appends the li-element to the end of the list. Useful functions
here are document.createElement() and Element.append() and also the property textContent that you have
already used in the previous exercise. See: Modifying the document
4. Next you should implement the submitHandler(e) function. You already know that this function is responsible
for interrupting the form submit event and cancelling it. But this function is also responsible for reading
value of the the input field just like in the previous exercise. And again this function checks whether the value
is empty or contains only spaces and in that case it should do nothing else. On the other hand if the input value is
not empty this function should call the addListItem(text) function and pass the input value in as an argument.
You could of course simply create and add the list item inside submitHandler(e) but it is usually a better idea
to separate the concerns of each function so that your code is easier to understand and maintain in the future if
you need to change it. For the same reason we have named the functions with long and descriptive names so that anyone
reading the code can immediately understand what each functions is responsible for. Finally your submitHandler(e)
should reset the input field value back to empty string.
5. Attach the submitHandler(e) function to the form submit event. You should already know how
this is done based on the previous exercise.
6. Reload your page to make sure that your changes to the JavaScript file are loaded and test your application.
Try submitting text and see if the the text is appended correctly at the end of the TODO list and the input field
is reset to empty. Try this a few times. If everything works you can move on to the next phase otherwise you should
see some error messages in the browser console. Depending on the message you should try to locate the source of the
error and fix it. At this point the most likely source of errors is the addListItem(text) function but it is also
possible to have mistakes inside the submitHandler(e). In any case the error message should include the line number
of the error. See: Debugging in Chrome
7. Next you should implement the function listClickHandler(e) which is the event handler that is responsible for
handling all those clicks to each individual list items and then giving them the class “done” and on the second click
removing the list item from the document. This time you don’t have to cancel any default event since clicking a list
item (li-element) does not have a default action to cancel but it does not do any harm if you cancel it anyways. This
time the e argument refers to the click event and you need to get to the actual li-element that was clicked.
Fortunately the event knows that and offers it in its target property. This means that the list item that is
clicked can be accessed as e.target. In our case this should always be a list item but there is a chance that
somehow the user has clicked another element and it is usually a good idea to check that you are actually dealing
with the element you think you are. Therefore the very next thing is to ask the element itself whether it is
li-element or not. This can be done with Element.tagName property or in our case e.target.tagName and it
should have a value “LI”. If the element is not a list item you should do nothing since we do not want to change
anything else in the document. Now lets first just remove the item from the list. Removing an element
can be done with node.remove(). See: Node removal
8. Attach the listClickHandler(e) function to the TODO list ul-element’s click event. You should already know
how to do this. NOTE: Here we attach this listener on the ul-element and not on each individual li-element.
This is possible because of event bubbling. See: Bubbling and capturing
and Event delegation
9. Reload your page and test your application. First add a few items to the list. This should work just fine since
you already completed that stage. Then try to click one of the list items and see it hopefully disappear. If that
happens click all the other elements too and see if you can make the list empty again. If something went wrong you
can see the errors in the console as usual. This time all the errors should be in the listClickHandler(e) function.
Fix errors and try again.
10. Now it is time to add the check for the class “done” and adding the class if it is missing. You can access all
the classes an element has with its classList property. You can add a new class to the element, remove an
existing class and also toggle a class to either add or remove a class depending on whether it existed on the element or not.
In this case you can add the class to the element with e.target.classList.add("done") and you can ask if the
element already has that class with e.target.classList.contains("done"). Remember that if the li-element does
not have the class “done” you should add it and not remove the element from the list. And only when the element
already has the class “done” you should remove the element.
See: How To Modify CSS Classes in JavaScript
11. Reload your page and test your application. First add a few items to the list. This should work
just fine since you already completed that stage. Then try to click one of the list items. If the item
changes its appearance try clicking another element to see it change too. NOTE! Here you must also
have the stylesheet or the class “done” does not change anything and you don’t see any change.
If everything worked so far go ahead and click one of the items second time and see it hopefully
disappear. If that happens click all the other elements too and see if you can make the list empty again.
If something went wrong you can see the errors in the console as usual. This time all the errors
should be in the listClickHandler(e). Fix errors and try again.
12. Before submitting this exercise do one final check so that everything is in place and then go ahead and submit. Congratulations!
A+ presents the exercise submission form here.