Course Project: NowItWent - an urban Tampere adventure
The course project is done in groups of two. The course staff provides functionality that must be used in the project.
Deadlines
- Final submission: 30.11.2020
- Grace period ends: 7.12.2020
Program to Implement
The goal of the project is to implement a game – named NowItWent – where the busses and passengers moving around downtown Tampere act as a part of the game. You can affect the game you will implement in many ways.
Gameplay
When starting the program a settings dialog is shown. After entering the setting the program moves to the main window of the game where the map of downtown Tampere is shown as the playing field. On the map the busses, bus stops and the players playable figure are shown.
In the game, the busses move around the city in real time according to real bus lines and timetables. The passengers get on and off the busses at the busstops. The player controls the playable figure that can interact with the other actors in the game. The figure can be for example a passenger or a drone flying over the city. The final goals of the game are left to the student development team to decide. The game can be e.g. a zombie apocalypse adventure or a city challenge. A new transport type can be implemented into the game.
Implementation
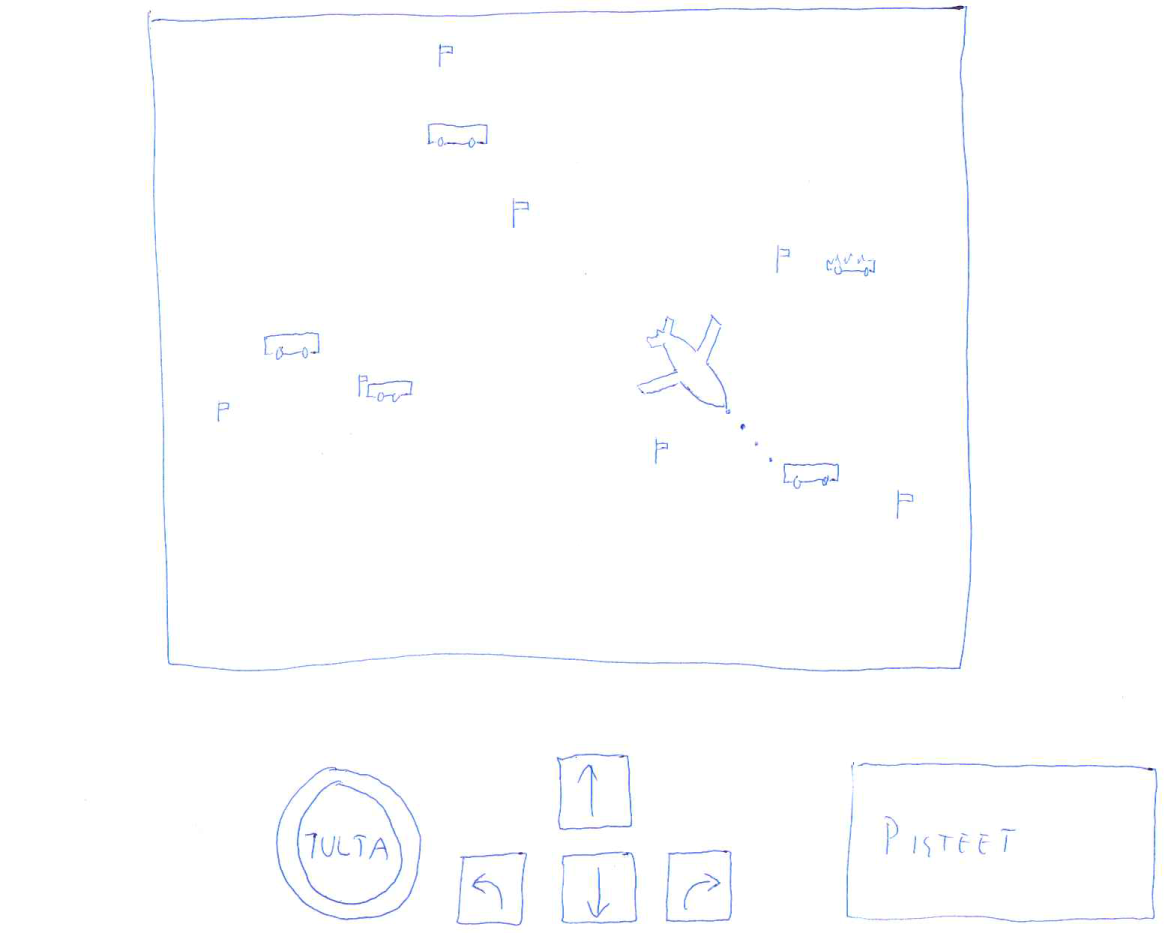
The game contains ready-made parts. These are the busses and basic passengers and the logic that moves them about town. The team needs to implement the functionality for the city itself, the playable figure and the main window. Below a rough example of what the GUI of the game might look like:
Many details of the game are left intentionally open and you can implement them as you wish. These include:
- The goals of the game: How the game ends and how success is defined?
- GUI: What the map looks like? How different actions in the game can be done?
- The start situation: What game pieces/resources the player has in the beginning and how they are placed in the game?
- Own game mechanics: Do the game objects have any special actions? Can the players trade with each other?
- Game state: Whose turn it is? When the game ends?
Use Case
The following order of actions depicts the start and funtionality of the game. This is an example. Your game can be different from what is depicted here.
- The game starts with the help of a self-implemented main program. The game asks with a separate configuration window the number of players and other information needed by the game. After this the main window implemented by the group is opened. On it, there is the game board with the map, the players gamepieces and other necessary information.
- The given implementation produces buses onto the map and moves them according to their schedules. On the busstops, passenger get on and off the busses.
- The player starts the game by clicking a game piece in the main window.
- The player moves their playable figure with the arrow keys to move toward a close-by bus that just picked up a couple of passengers.
- The player shoot at the bus with a stun gun. When hit, the bus stops and turns pink. The passengers on the bus need to walk.
- The player seeks new busses as their target. In the main window statistics about the stuck busses and the passenger on foor is show.
- The game ends after five minutes of gameplay and the final score is shown to the player.
- The player closes the game.
Learning Outcomes
You practice the following things:
- Getting familiar with existing code and using it by provided interfaces (applying design by contract)
- Adding functionality to an application based on given interfaces (following design by contract)
- Implementing a GUI as a part of program
- Exception handling and error control
- Unit testing of your own code.
- Implementing a program as a team effort
Compulsory Requirements
You must implement at least the listed basic features to get the project work accepted. Moreover, there some optional additional features, and by implementing them you can increase your grade. With the minimum implementation you can pass (grade 1). Implementing the requirements set for the intermediate implementation, you can get the grade 3. A higher grade requires the implementation of some additional features.
Minimum requirements (Max Grade 1):
- Successfully compiling game.
- Some kind of game-mechanics implemented (e.g. player turns, scoring)
- One dialog-window (e.g. Start menu to specify amount of players, goals etc.)
- At least one own actor
- UnitTests have been written at least for the Statistics class, which keeps track of the events in the game so far and if needed calculates the points.
- Final document that must contain:
- Game-rules
- Game-controls
- Class responsibilities (class diagram is good tool in this)
- Division of labour.
Intermediate requirements (Max Grade 3):
- Meets minimum requirements.
- Own graphics fully implemented by the team (no using the course library drawing)
- The playable figure can be moved on the game are. For an intermediate implementation it is enough that the figure moves immediately without any animation e.g. to the point indicated by the cursor or a fixed amount of steps to a direction shown.
- At least one additional unique actor has been implemented
- The game works
- Bonuspoints can compensate up to one grade’s worth of mistakes.
Top-grade requirements (Max Grade 5):
- Must meet minimum and intermediate requirements
- At least 2 additional features.
- Bonuspoints can compensate up to one grade’s worth of mistakes.
Additional Features
The features listed below do not need to be implemented but a good implementation is worth an increase in the gradfe. Each additional feature is worth 0,5 grade. The effect of a feature can be increased if it turns out to require more work than expected. In order to get the grade increase, the feature must be documented in the submission. The people grading the projects do not look for features from the code.
- Even screen updates. The game ara is udated to show the changes with fixed intervals instead each triggering a separate change. The ``QTimer``class can be useful here.
- Minimal screen update. When an actor’s state is changed, only its surroundings are update in the game area instead of drawing the entire map.
- Scrollable map. The game area is not tied to the Tampere city centre. The area changes based on the movements of the playable figure. (max. 1 grade)
- Even movement of the playable figure. Instead of immediately jumping from one place to another, the figure is told to go to a place and it moves there with a suitable speed.
- Passenger amounts. The amounts of passengers on the busses and the bus stops is shown on the map for example as numbers over the icon.
- Following the game state. Statistics collected during the game are shown in real time in the main window.
- Top10-list. A Top10 list is implemented into the game. The contents of the list are kept from closing the game to starting it again.
- Local multiplayer. There can be several playable figures in the game (e.g. a zombie passenges and a zombie fighter) that different players can control for example one with a mouse and one with the keyboard. The points can be joint or separate. (max. 1 grade)
- A wide range of transport choices. The playable figure has at least three different means of transportation to move about the city.
- Updates to the playable figure. The playable figure can be updated by collecting, buying or acquiring upgrades in some other way. The upgrades effect the figures movement or attack abilities.
- Hijacing passengers. The playable figure can highjack the passengers in some way for example from disabled busses and transport them to a suitable point on the map.
- Own feature. An additional feature outside this list has been implemented. Note! The feature needs to clearly require coding.
- Ai player (max. 1 arvosana)
- Saving the game state and continuing after restart (max. 1 arvosana)
- Note! Additional features must clearly require coding.
- Note! ALL ADDITIONAL FEATURES MUST BE DOCUMENTED TO GET THE POINTS
Grade calculation
Grading will consist of smaller sections and bonus-points. Final grade is limited by requirements specified in previous subsection After meeting intermediate requirements, bonus points can compensate 1 grade. After implementing 2 additional features, bonus points can give 2 extra grades.
Graded sections:
- Overall design and structure
- Class design and implementation
- Proper principles in object-oriented programming
- Class documentation
- Exception handling
- Proper usage and handling of exceptions
- Code quality
- Following good programming principles.
- Style
- Version history & Teamwork
- Bonus points
- Awared from additional features.
Scoring from graded sections:
- 50% => 1
- 70% => 2
- 90% => 3
Arvosanan määräytyminen
Extra work qualified for bonus points:
- Additional (well implemented) unittests (up to 0.5 grades)
- Additional Tiles, Buildings and Workers (up to 0.5 grades)
- Nice graphics (up to 1 grade)
- A very good GUI (up to one grade)
- Back story and depiction of the game world (up to 0.5 grades)
Examples:
- Only minimum requirements met and perfect score in graded sections, no bonus-points ( 3 + 0 => 1)
- Minimum and intermediate requirements met 75% of graded section score, 0.5 grades worth of bonus-points ( 2 + 0.5 => 2.5)
- Minimum and intermediate requirements met 60% of graded section score, 2 additional features and total of 3.5 grades worth of bonus points (1 + 3.5 => 4 )
- Only 3 points are taken in account from the 3.5 (1 for graded section compensation, 2 for extra grades)
Environment
The working environment is in GitLab. Each team has a repository named based on the name of the team. It is worth to note that some team names were adjusted to match suitable names for a GitLab project. The parts implemented by the course are given also through version control.
Class Diagram
The relevant classses in the program.
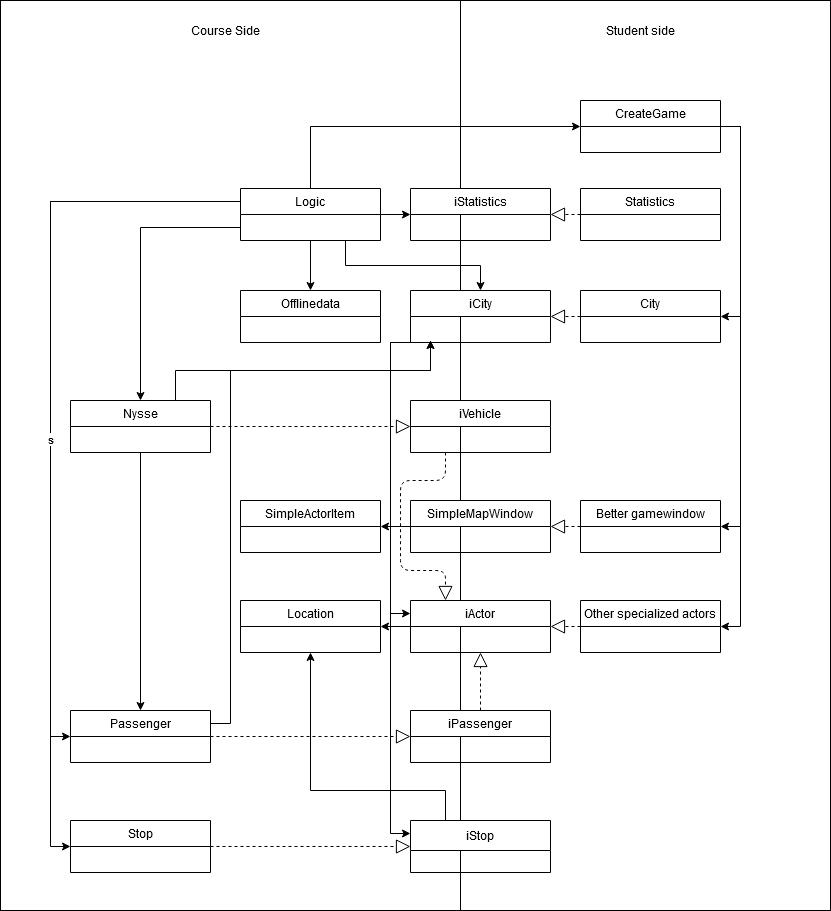
NOTE! The part depicting the students’ implementation is completely fictitious. There can be (and should be) more classes and there relationships can be completely different.
You can generate the Doxygen documentation of the interfaces directly from the project. Read the README for more information.
Hints
- Check what is implemented on the course side
- When designing the project:
- Make your own class diagram that clarifies the structure and division of work
- Go the functionality of the game through with the help of the class diagram and/or sequence diagram
- Start coding only once you have a clear plan in order to be able to concentrate on solving codebased problems
- You can inherit own versions of course library buildings, tiles and workers if you what to modify costs, production or add functionality
- All game objects can be given additional text based metadata
- You can ask for bug corrections and additions to the course code
- NOTE! Additions to the library should be asked as early as possible in order to allow enough time to implement them. Do the design early and with care.